| Author |
Tutorial: How to Install Sony Ericsson Camera Drivers! |
mriley
Joined: Oct 03, 2009
Posts: > 500
From: UK
PM |
Intro
Guide
Program Download
Problems
This Guide isn't intended for phones on the A2 platform (DB3150 & DB3120)
If Your phone is A2 (C510, C702, C901 C902, C903, C905, G502 , K630, K660, K850, T700, V640, G705, W595, W705, W715, W760, W890, W902, W910, W980, Z750, Z770, Z780)
Follow this tutorial by tranced - you will need this version of A2 uploader (CID 53 compatible)
A2 Uploader is also easier/more user friendly than Far manager - same concept but uploading via different program than this
More info on uploading files to A2
==========================================================================
This guide is compatible with phones on the A1 platform
(K530, K550,, K610, K618, K618, K770, K790, K800, , K810 K610, V630, , , W580, W610, W660,W710, , W830, W850, W880, , W888 W910,W950, W958, , Z610, Z710, , Z710, M600, M608, W580, , P990, S500, T650, V630)
========================================================================
What "DB" number is my phone??
Use this tool to find out 
OR
See image below:
http://img85.imageshack.us/img85/9899/20091224200829.png
Extract from Topse.ru
pnx5230; CID 49/51/52/53 : pnx5230; CID 49/51/52/53:
* W350, W380, Z310, Z555 W350, W380, Z310, Z555
DB2000; CID 36/37/49 : DB2000; CID 36/37/49:
* K600, K608, V800, W900, Z800 K600, K608, V800, W900, Z800
DB2010; CID 36/49/50 : DB2010; CID 36/49/50:
* K300, K310, K500, K510, K700, K750, W300, W550, W600, W700, W800, W810, Z520, Z530, Z550 K300, K310, K500, K510, K700, K750, W300, W550, W600, W700, W800, W810, Z520, Z530, Z550
DB2012; CID 50/51/52/53 : DB2012; CID 50/51/52/53:
* K320, W200, W300, W810, Z530, Z550 K320, W200, W300, W810, Z530, Z550
DB2020; CID 49/51/52/53 : DB2020; CID 49/51/52/53:
* K530, K550, K610, K770, K790, K800, K810, S500, T650, V630, W580, W610, W660, W710, W830, W850, W880, Z610, Z710 K530, K550, K610, K770, K790, K800, K810, S500, T650, V630, W580, W610, W660, W710, W830, W850, W880, Z610, Z710
DB3150; CID49/51/52: DB3150; CID49/51/52:
* C702, C902, G502, K630, K660, K850, V640, T700, TM506, W595, W760, W890, W902, W910, W980, Z750, Z770, Z780 C702, C902, G502, K630, K660, K850, V640, T700, TM506, W595, W760, W890, W902, W910, W980, Z750, Z770, Z780
DB3200/3210; CID49/51/52/53: DB3200/3210; CID49/51/52/53:
* C510, C901, C903, C905, G705, T707, T715, W508, W705, W715, W995 C510, C901, C903, C905, G705, T707, T715, W508, W705, W715, W995
=======================================================================
Introduction to camera drivers
It doesn't matter what firmware your phone has when installing a camera driver, as long as the cam driver is made for your model. For example, a C905 cam driver could not be applied to a C902 (or any other model) because the cameras in the phones are different. But a C905 cam driver could be used by any C905 user no matter what firmware they have.
What you are basically doing when you download a cam driver is downloading a file called "camdriver0.dat" your phone already has a camdriver0.dat file installed on it by the company who made the phone. (In your case I'm guessing Sony Ericsson but this method should work with any make of phone.) When you install a camera driver on your phone all you are doing is replacing this file
There are two different types of camera driver,
A Manual cam driver - this will give you control of multiple parameters (options) for your phone's camera, such as the ISO value, the shutter speed, focusing and saturation
A Point and shoot cam driver - This will improve settings in automatic mode, such as the white balance, saturation and sharpness
For both types of camera driver, installation is exactly the same 
Full Guide from start to finish
1. Create a folder in your desktop called �Phone Modding� this is to keep things organized so you will know where to find things 
2. Install Winrar and drag the installed program into the folder you made earlier (you will need this to open the camera driver and extract that cameradriver0.dat file you need)
Wait for the dialog box to pop up (if it doesn�t click on the given link) then click �Save File�, then find the downloaded file called �wrar390.exe� double click on this to install the Winrar program. Take note of where the program is going to be saved on your PC, click install, then press OK, then Done, then OK (on the dialog box that pops up annoyingly) Then a dialog box should automatically pop up. (if it doesn�t then look for the program from where it was being saved, for me under program files) In the dialog box there should be three files, drag the �Winrar� file out onto your desktop, then drag it into the �Phone Modding� folder you made (ignore other two files)
3. Choose your camera driver!
If you are unsure about which camera driver to use, there�s a long list of them here!
4. Download your camera driver
When you have found the camera driver you want, click on the download link supplied in the thread, then click download file, a window should pop up asking you which program you want to download it with, make sure the program is Winrar and that you can see the little logo of three books, also make sure the �save as� box is selected and not the �open with� box. It should look like this
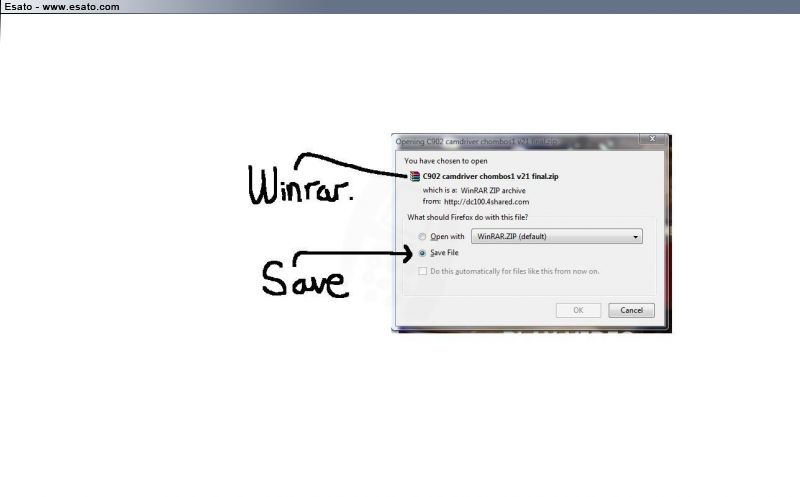
now press ok, then find the downloaded file on your PC, when you have found it drag it into the desktop folder you made earlier.
5. Extract the camdriver0.dat file
In the desktop folder (�Phone Modding�) you should have two files, the Winrar program and the downloaded camera driver (in Winrar format)
To extract the camdriver0.dat file you need to right click on the downloaded camera driver file and select �Extract Here� this will extract the content of the camera driver so it�s not in Winrar format anymore. (This is shown below) Inside the extracted folder is the camdriver0.dat file, now in a usable format! 
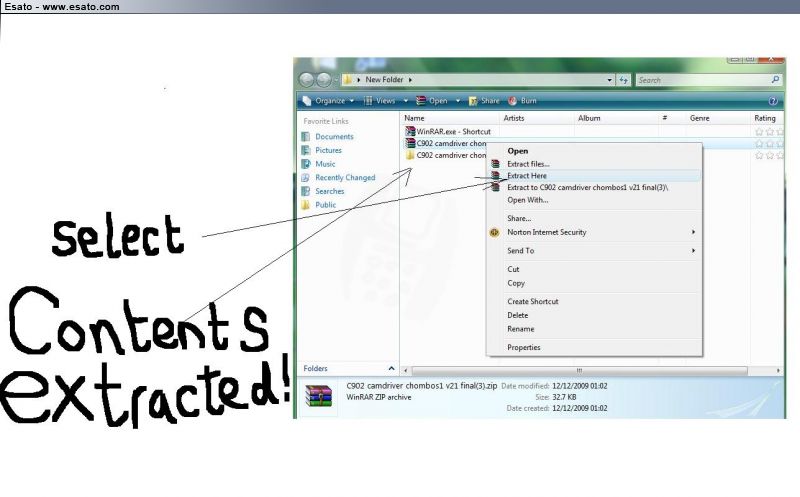
6. In your desktop folder you should now have three files, the Winrar program, the downloaded camera driver and the extracted contents of that camera driver (this can be either a folder containing camdriver0.dat or just the camdriver0.dat file on its own)
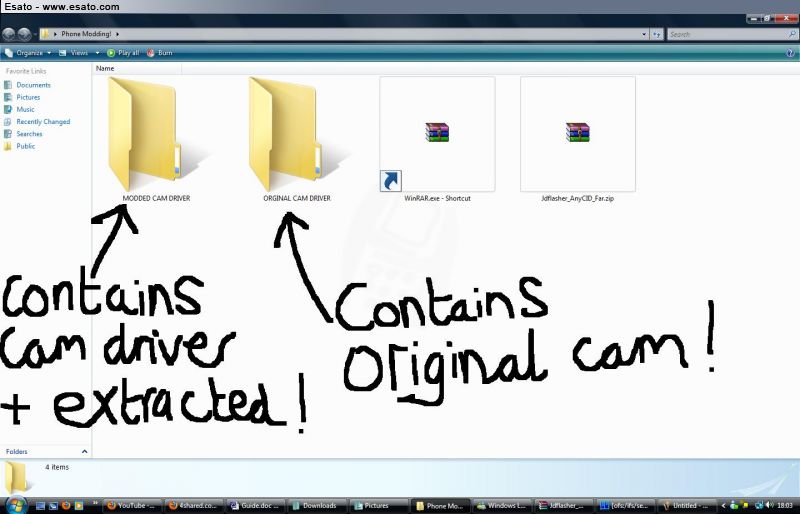
Now you need to create a folder called MODDED CAM DRIVER and another called ORIGINAL CAM DRIVER. Then drag the downloaded camera driver and its extracted contents into the MODDED CAM DRIVER folder.
7. The rule when modding is to always make a backup! So you need to download the original camera driver for your phone�s firmware (different firmwares have different original camera drivers) The original cam driver for your model and firmware can normally be found in the thread you found the modded camera driver for your phone, if not search the esato forum or use google Once you have downloaded it drag the original camdriver0.dat file into the ORIGINAL CAM DRIVER folder inside the �Phone Modding� folder you made at the start.
8. Install Far Manager with JD Flasher Plugin Save the file in Winrar format, then drag the downloaded file (still in Winrar format) from your downloaded files and into the desktop folder. Now your desktop folder should have these folders in.
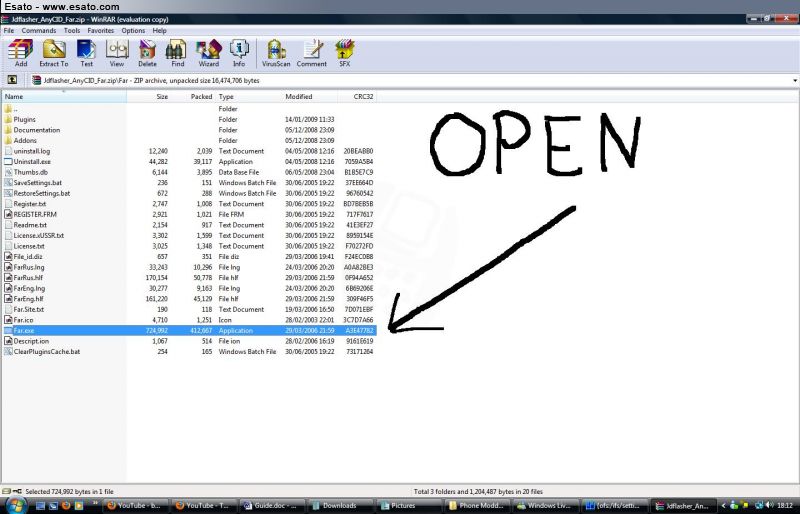
9. Now open Far Manager with JD Plugin, this will open in Winrar (because it�s in Winrar format) Then select the �Far� folder given, then you will see a long list of files (shown below) You need to open the file �Far.exe� in the list.
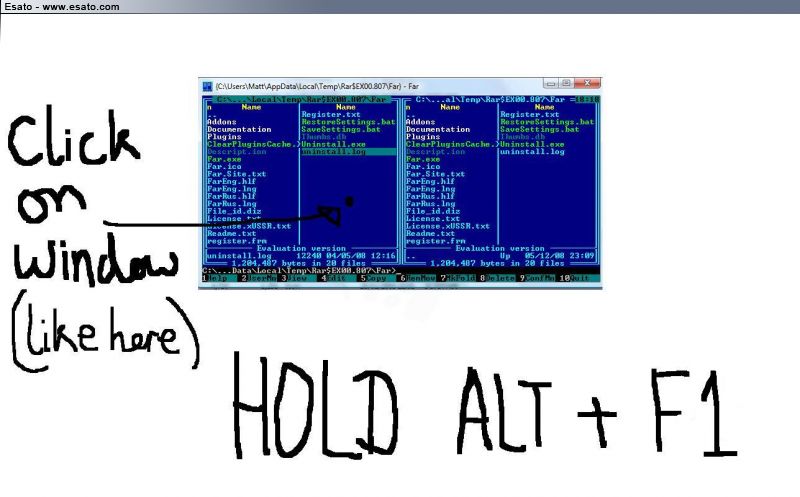
10.A blue window should have popped up (shown below) This is the program you will now use to install you camera driver! You need to click on the window (in the blue space or anywhere you want) to activate it, then Hold the Alt key and then press the F1 key
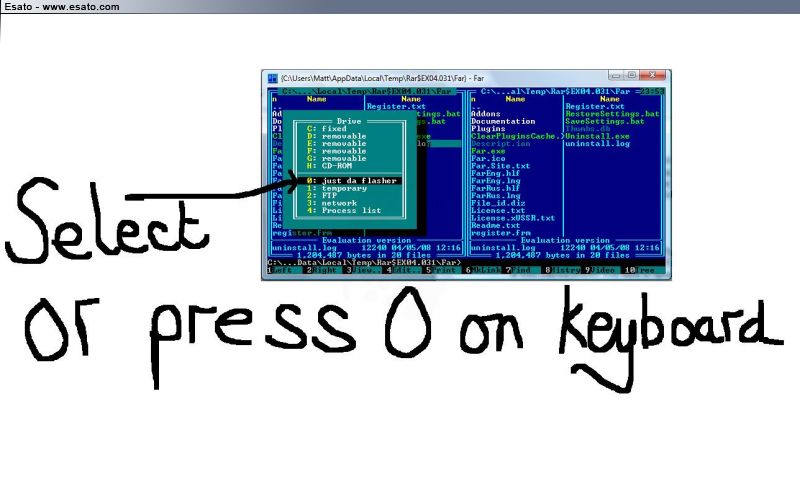
11. A blue box should have popped up on your left, you need to select �Just da Flasher� from the list (or press the 0 key on your keyboard)
12. Ok! Now its time for the fun bit . It�s almost time to connect your phone, but before that you need prepare. This is what your screen should look like.
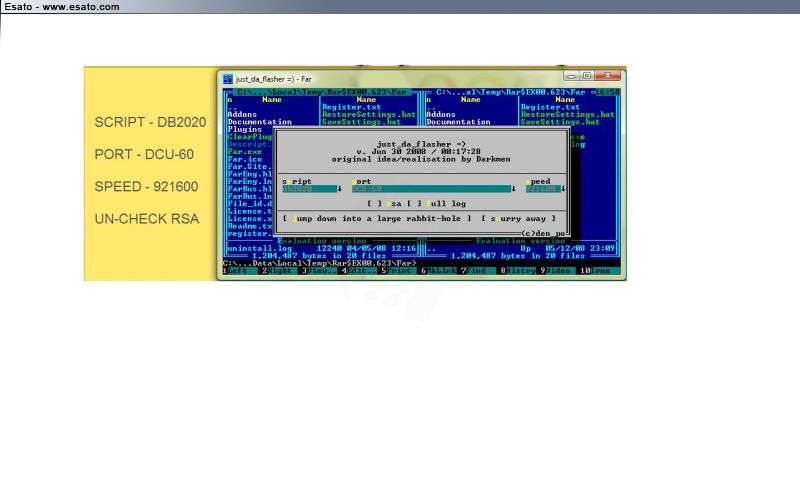
You need to uncheck the �rsa� box, make sure script is �db2020� port is �DCU-60� and the speed is at �921600�
[b]13. Preparing for connection, make sure your phone has at least 90% charge. Turn off your phone. Remove battery. Re-insert Battery. Now, make sure your phone cable is plugged is plugged into your PC. Ok, now its time for connection.
14.Read the whole of this step before you do it.
Make sure the above step has been completed (The program will give you 30 seconds to connect the phone once you have pressed �Jump down into a large rabbit-hole�) When ready, press that button, hold the C button on phone then connect your phone cable to your phone, keep holding C** until connected (shown by grey window closing itself
**If your phone isn�t connecting to the program then hold the �2� key on your mobile whilst connecting to the program, if this doesn�t work try holding keys �2� and �5� together whilst connecting the phone
****IF you are having problems connecting your phone, then perhaps your mobile doesn�t get on with Far Manager, if so, you should use this tutorial instead. If you have never used A2 uploader before then this might help you. If you have any problems either post in this thread or send me a PM
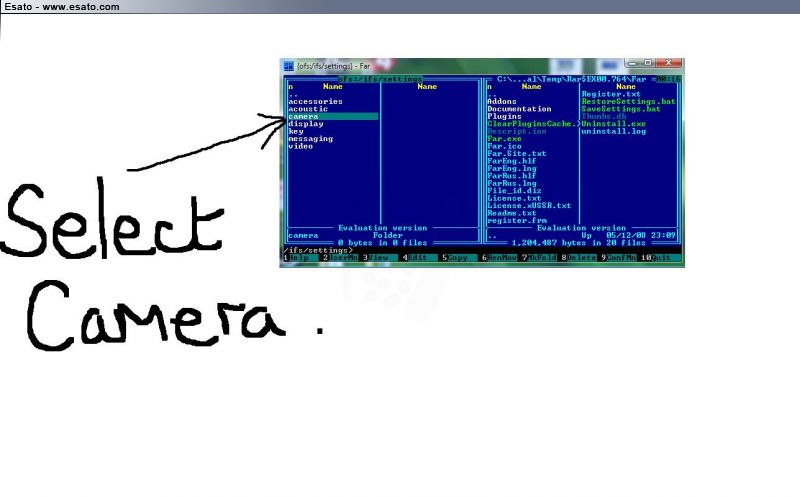
15. Good! You are now inside the file system of your phone! Follow these instructions to find the phone�s current camdriver0.dat file
Now select �ofs� from the two options (wait until loading is complete) then select �ifs� from the list, then select �settings� then select �camera� This process is shown below
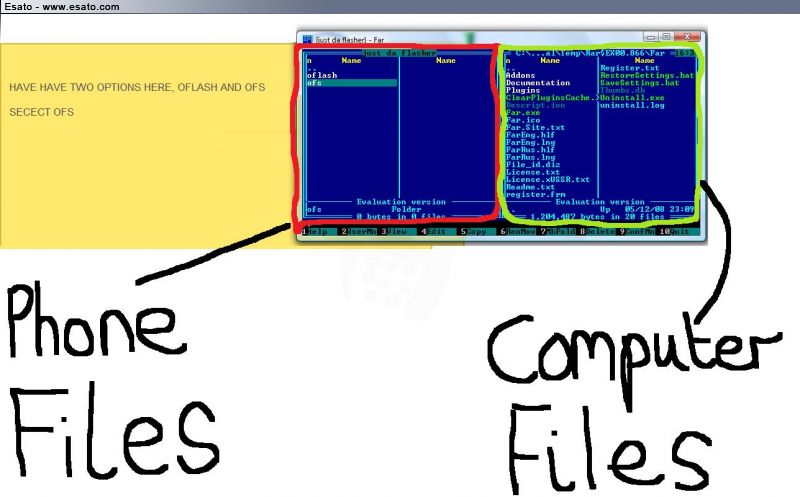
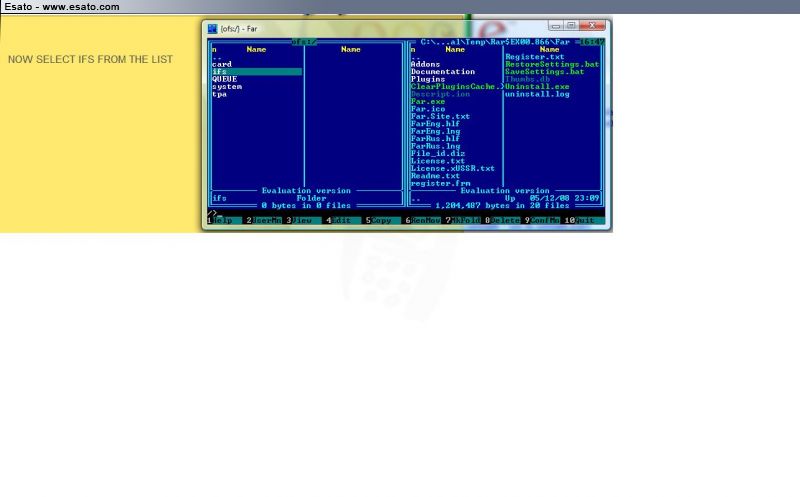
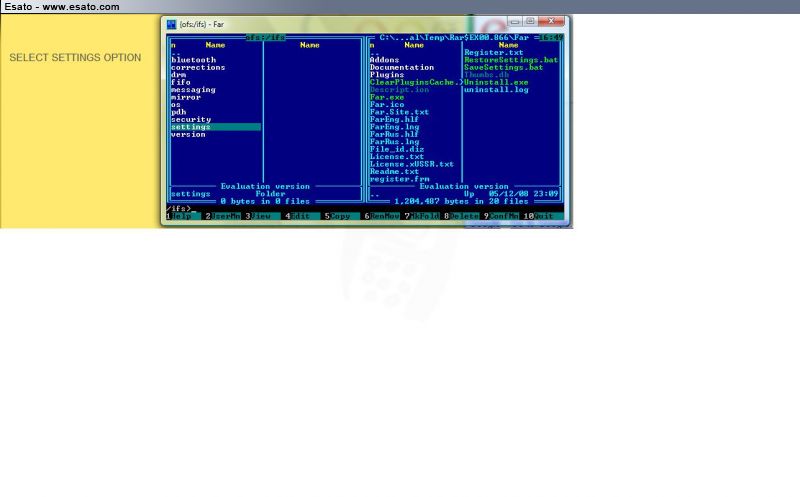
Note: See how the program is split in half? The left half is your phones file system and the right half is your computer�s file system
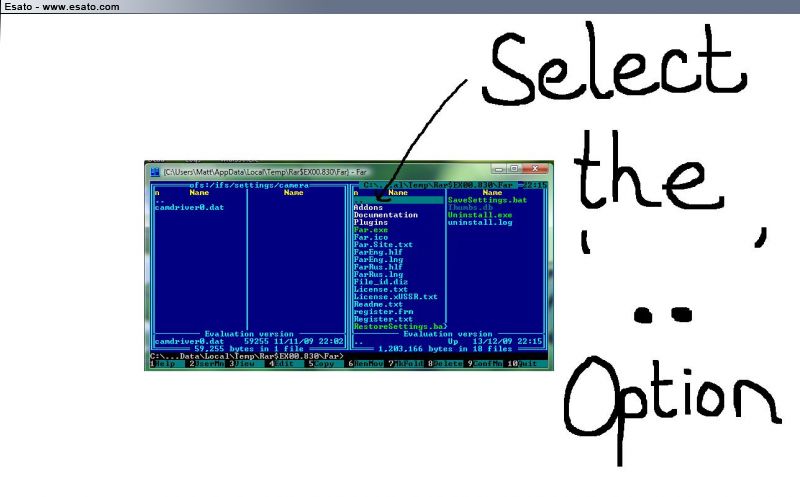
16. Now you should see (on the left hand column of the program) your current camdriver0.dat file (maybe along with other files but ignore them) You now need to replace that file with the modded one you downloaded at the start. On the right hand side of the program you should see two columns of files, these are your computer files. This is shown below

17. On the right hand section of the program you need to press the �..� option at the top of the list of files This will take you back one step, currently I am in the Far Manager folder (the folder where you found the Far.exe file) but pressing �..� will take me back to the �Far� folder, press �..� again and again until you find a list with �Desktop� in. (These two situations are shown below) [i] Note: the �..� option will always be at the top of the list, so if I can�t see it, just scroll up, till you see it )
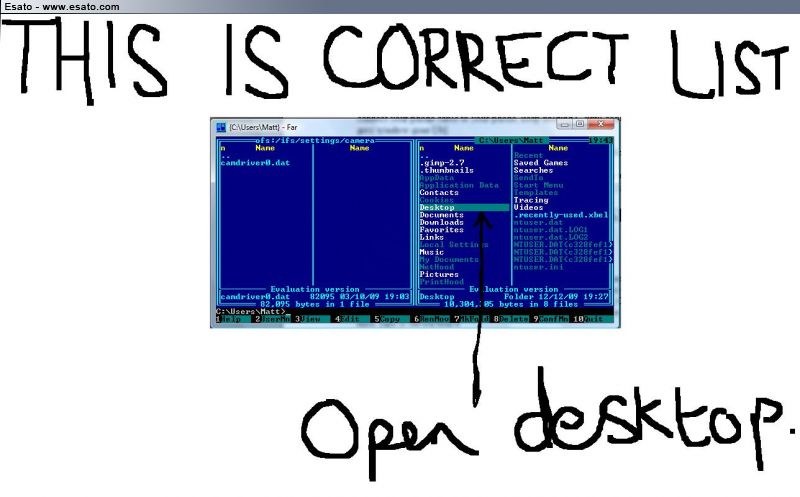
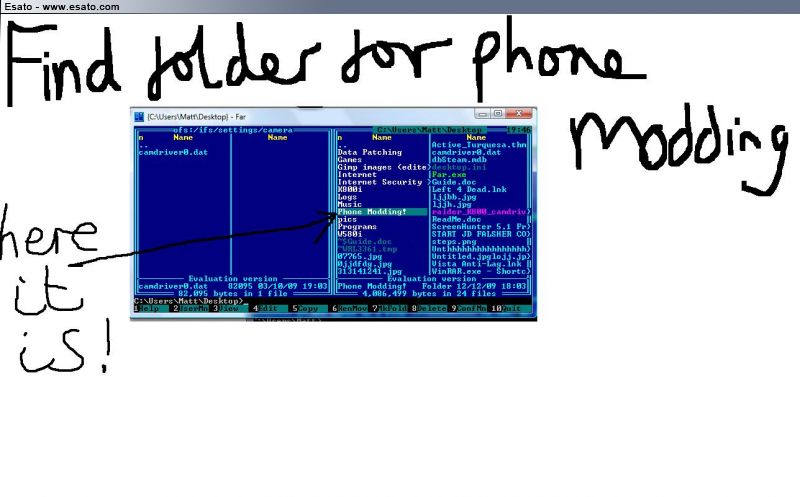
18. Open the �Desktop� option in the list, Now you need to find the folder you made at the start, the folder should be shown in white letters on the list (as it�s a folder not a file) I called my folder �Phone Modding!� and I can see it in the list below 
Open this folder, and then open the MODDED CAM DRIVER folder from the list and you will see these files: the camera driver in Winrar format (pink) and the extracted contents of the camera driver (white) which includes the camdriver0.dat file you want! Shown below:
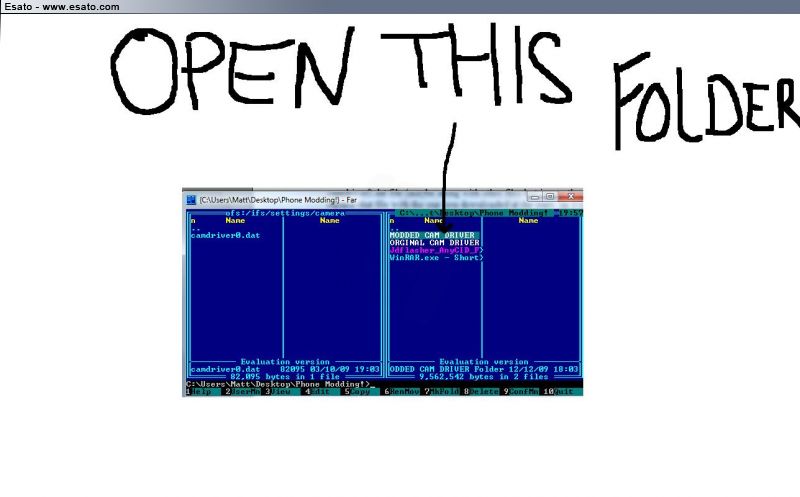
You need to open the extracted version (the one in white writing) and you will now see the camdriver0.dat file you have been looking for! (shown below)

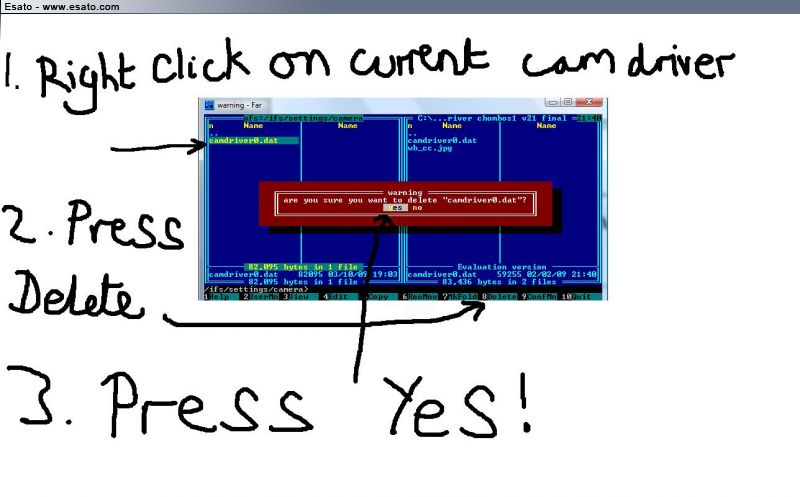
19. Now, you need to delete your current camdriver0.dat file this is the camdriver0.dat file on the LEFT section of the program (in your phone�s file system)
You do this by right-clicking on the file and then clicking �delete� on the bottom row of the program, then clicking �yes� to confirm. This is shown for you below:
[i] Note: FS is short for file system.
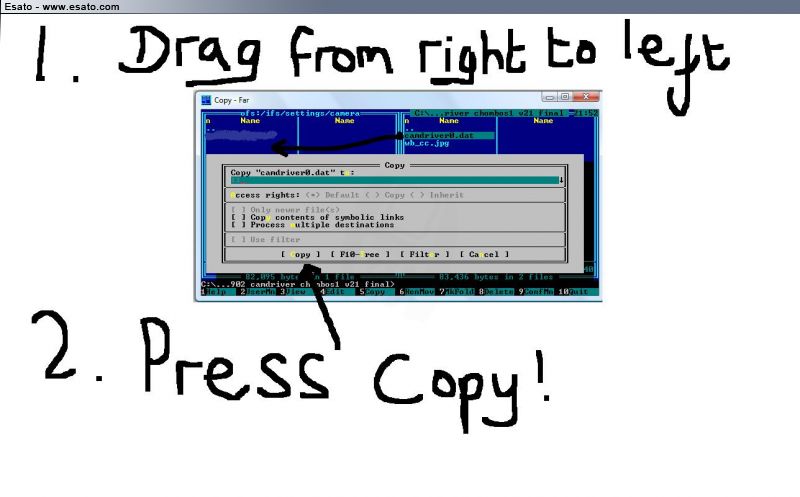
20. All you have to do now is drag the modded camdriver0.dat file from the right section across into the left section of the program! (from the PC FS to the phone FS) [i]You do this simply by holding down the left mouse button and �dragging� the file across, then just click �Copy� in the grey box that pops up. Again, this is also shown below
Now you have the modded camera driver in your file system! But you still need to save it in there. You do this by clicking the �..� symbol (in the left hand side of the program) repeatedly until you come across this message (below) �warning are you sure?� (basically asking you whether you want to save settings) press yes.

Congratulations! Now you have a modded camera driver installed on your phone! All you have to do now is remove and re-insert the phone�s battery and start the phone
Thanks for taking time to read the guide and I hope it helped
---END OF GUIDE---
Problems Section
If you have are having problems with any of the 20 steps please state which step you are having trouble with by replying in this thread
If you have followed all the instructions correctly, unplugged your phone, but your phone won�t start then you need to remove and re-insert the phone�s battery and start the phone Or the phone could have run out of charge (unlikely if you had 90%) but try charging if other solution doesn�t work.
If you have followed all the instructions and started up your phone but the camera wont start, or there is an error with the camera, whether taking pictures or trying to open it, don�t worry. That�s why I told you to install the original camera driver
All you have to do is start from Step 9 and work your way through again, but instead of replacing original with mod cam driver you replace mod with original.
An example of a problem of this type is the �Another Application Running� message when you try to open the phone�s camera.
If you don�t like the modded camera driver and want to go back to your phone�s original camera driver, then you can! Just follow the solution to the problem above.
If you are having problems with finding the original camera driver for your model during the tutorial then you can always request it by replying in this thread
If far manager isn�t opening correctly, restart the program or download it again
Extra Info Section
Fancy changing the Acoustics Drivers on your mobile, increase volume, better equalisation and all round sound quality? Well, I don�t need to do another tutorial to show you how to do this. You install acoustic drivers in a similar way. Simply start at stage 15 (when you have connected your phone) open the �ifs� folder, open the settings option then acoustics. This is where you can find your current acoustic files which you can replace with modded acoustic drivers (found in the same place as the camera drivers) � see step 3.
Still Clueless? Then this is for you
Basically the program Far Manager with JD Flasher Plugin can be used to change anything on the File System of your phone...
Hopefully this tutorial has shown you the method of installing camera drivers/changing anything on the file system of your phone, you just need to know where to find it
[ This Message was edited by: mriley on 2010-07-14 17:32 ] Esato's Newbie of the year and Most Helpful Member 2010!  ------------------- Life is just a ride, enjoy it while you can | |
|
lukechris
Joined: Dec 30, 2007
Posts: > 500
From: Preston, UK
PM, WWW
|
Thanks mann
|
hihihans
Joined: Mar 15, 2009
Posts: > 500
From: Netherlands
PM |
Good job, Mriley
|
akudan
Joined: Apr 14, 2008
Posts: 97
From: Malaysia
PM |
thanx, good tutorial |
Jonasftw
Joined: Nov 13, 2009
Posts: 35
PM |
Isn't a2 uploader even more idiot proof? 
anyway, great guide! |
brys182
Joined: Jun 15, 2009
Posts: 246
From: Negative Space
PM, WWW
|
big thanks mate, nice one.
Don't be so quick to judge me, you only see what I choose to show you. |
mriley
Joined: Oct 03, 2009
Posts: > 500
From: UK
PM |
On 2009-12-14 08:17:47, Jonasftw wrote:
Isn't a2 uploader even more idiot proof?
anyway, great guide!
it could possibly be, yes But i don't think it works with every phone so i didn't use it for the guide
[ This Message was edited by: mriley on 2009-12-22 21:01 ] Esato's Newbie of the year and Most Helpful Member 2010! ------------------- Life is just a ride, enjoy it while you can |
mallaccra
Joined: Oct 01, 2007
Posts: > 500
PM |
excellent tutorial, thanks pal 
mallaccra®  Xperia Z2 |D6503|4.4.2| Xperia Z1 |C6903|4.4.2| Xperia Z |C6603|4.2.2| Xperia ZL |C6502|4.2.2| Xperia TX |LT29i|4.1.2| Xperia Ion |LT28h|4.0.4| Xperia P |LT22i|4.1.2| Xperia J |ST26i|4.1.2| Aino |
ceaser2008
Joined: Jul 14, 2008
Posts: > 500
From: Surat, India
PM |
Mriley, that is some nice and hard work. It is very informative as well.
|
Bonovox
Joined: Apr 13, 2008
Posts: > 500
PM |
Very well written & laid out New Award next year for Best Tutorial
Phone?? What phone?? |
mriley
Joined: Oct 03, 2009
Posts: > 500
From: UK
PM |
Thanks for all the feedback guys Ive managed to help over 20 people and that makes me happy. I've now included links to A2 Uploader if far manager doesn't work with the phone and included links for modding the acoustics of most phones!
Esato's Newbie of the year and Most Helpful Member 2010! ------------------- Life is just a ride, enjoy it while you can |
Bonovox
Joined: Apr 13, 2008
Posts: > 500
PM |

Phone?? What phone?? |
rich242
Joined: Dec 27, 2009
Posts: 3
PM |
Hi,
I've been trying to use Far with my w995, but when I try connecting it times out and gives an error (below). I've also tried A2 Uploader and others, and also had no luck. They all recognise the phone but can't seem to connect with it.
Error:
OpenPlugin(connecttophone(waitforz(no answer from phone)))
Any ideas?
Cheers. |
Junz
Joined: Jul 31, 2008
Posts: > 500
From: INA
PM |
Install SEUS and G*** which come with a2uploader.
Nexus 4 + C901 |
mriley
Joined: Oct 03, 2009
Posts: > 500
From: UK
PM |
check that you have the latest firmware with SEUS like Junz said and if it still didn't work then ill try and find another version of a2uploader that could work with your phone
#
I remember getting that error with my C901 connecting to Far Manager but i tryed A2 uploader and there was no problem, so maybe its the version of A2 Uploader or maybe you haven't downloaded the file that comes with it, but check your firmware and ill find another version of A2 Uploader that worked for somebody else.
[ This Message was edited by: mriley on 2009-12-27 15:01 ] Esato's Newbie of the year and Most Helpful Member 2010! ------------------- Life is just a ride, enjoy it while you can | |
|
Access the forum with a mobile phone via esato.mobi
|


 Posted: 2009-12-13 19:53


