

Posted by witchking
Why choose Cybershot Xperience?
So many additional features without losing any of the original ones!
*Amazingly vivid colours and quality
*ISO Control
for both flash and non-flash shots
*Advanced Auto-ISO Flash mode
*Shutter-speed control
for both Flash and non-flash shots
*Manual Focus
*Manual Contrast
*Manual Saturation
*Manual Sharpness
*Auto-exposure lock on/off
*Advanced Hue/Tint selection
*Manual Colour balance: Cyan, Red, Yellow, Purple
*Forced flash on/off
*Colour Correction On/off
*Focus and other features in video mode
Record videos in QVGA (320x240) and CIF (352x288) with the same driver
And more..!
Use and Enjoy the power of 5 mega-pixels!
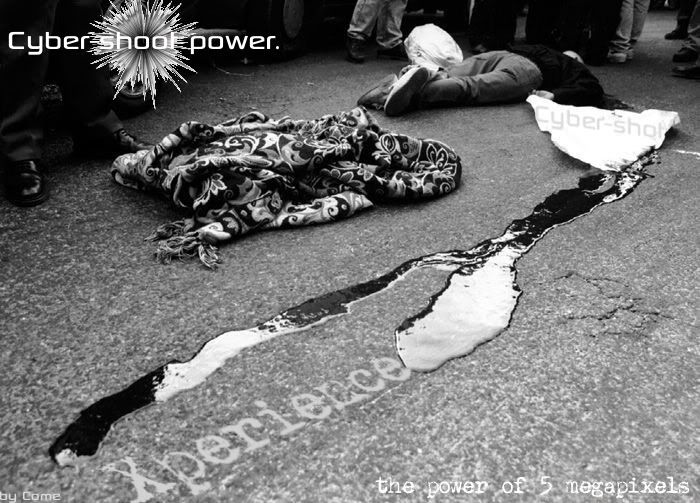
[size=1](Thanks to Come for this image and the title)[/size]
[size=6]CYBERSHOT XPERIENCE 8.0[/size]
Cybershot Xperience happens to be the first super-mode driver for the newer Sony Ericsson A2 platforms (DB3150, 3210 etc). Users and modders had given up on Manual settings for these models and considered it impossible due to firmware restrictions. Yet, Cybershot Xperience moved on beyond the others and introduced super-mode into A2! All the manual features and functions in CX scheme have been written by, and remain the property of witchking, and should not be used without crediting the author.
----------
Change-log in 9.0
(See pg11)
Change-log in 8.5
v 8.5 finally tested and uploaded
Cybershot Xperience 8.5 Change-log:
* Auto-mode and scenes have been improved.
* Improved Video Mode. (Please note - if the video darkens on switching CIF mode on/off, restart the camera after switching)
* Now users can EASILY make their own Language files with a few clicks!
1. Download SvanSvan's LNG Editor
2. Get your [hw]K850[/hw] original language file provided with the driver archive, or through your phone (tpa/preset/system/language) through A2Uploader.
3. Open your language file in LNG Editor.
4. Load Changes_BO_en.xml into the LNG Editor.
5. Save your Language File.
* Auto-Flash ISO mode has been greatly enhanced. Works in a splendid manner according to distance of object from camera. More intelligent Auto-ISO than before.
* Effects and White Balance have been combined in the same option in the Manual Settings 2 Tab.
Their order has also been changed to make their use more easy.
WB:
0.0 = Auto
0.3 = Daylight outdoor
0.7 = Cloudy outdoor
1.0 = Fluorescent
1.3 = Incandescent
Effects:
0.0 = None
-0.3 = False Colours
-0.7 = Negative
-1.0 = Black and White
-1.3 = Sepia
-1.7 = Solarize
* A new effect called False Colours has been added.
* Beach and Snow mode has returned to help in shooting in brightly lit environments.
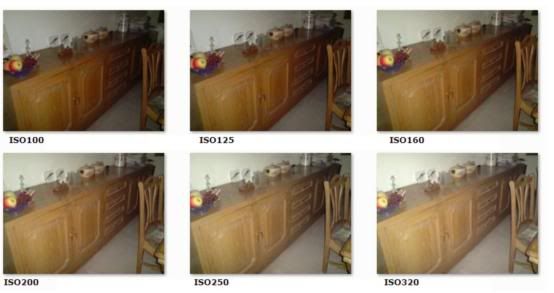
* ISO for Flash and Non-Flash shots can be managed together very easily and conveniently in the Manual Settings 1 Tab.
Switch to ISO in Manual Settings 1 Tab
-2.0 = ISO 100
-1.7 = ISO 100
-1.3 = ISO 125
-1.0 = ISO 160
-0.7 = ISO 200
-0.3 = ISO 250
0.0 = AUTO
+0.3 = ISO 320
+0.7 = ISO 400
+1.0 = ISO 500
+1.3 = ISO 640
+1.7 = ISO 800
+2.0 = ISO 1000
* Manual Focus can work without selecting infinity focus first (Deddot's mod)
---------
Change-log in 8.3:
* Video recording changes BETA (NOTE: Few people complained of darkening of video in CIF mode. It is due to a firmware bug. Just restart the camera after switching between QVGA/CIF and then it will be okay)
* Improved Auto-mode
* Many minor changes
Change-log in 8.0
* New LNG file
* Two versions of driver to choose from, high and low buffer versions
* Flash mode Megachanges. Auto ISO mode added in Auto mode EV 0.0, particularly good for macro and close-ups.
* Improved Colours in flash and non-flash shots
* Default EV mode is now a more effective control of Shutter-speed
* Many minor improvements
Change-log in 7.7
* New LNG file
* Changed White balance for higher ISO Flash Modes
* Manual Contrast and Saturation can now be used with flash
* Slightly more saturation
* Many minor improvements
Change-log in 7.5
* New refined Manual settings code with incredibly smooth EV steps
* Better colours
* Improved Flash mode
* Manual Hue and Colour balance can now be used with flash mode
* Camera consumes lesser heap memory
* Many other minor changes
Change-log in 7.2
Pure ISO control for non-flash implemented in Beach/Snow mode (it seemed to work improperly in daylight with the code previously used). Beach/Snow scene has been changed to auto + Non-flash ISO.
New LNG file
Improved colours slightly
Better portrait scene
Change-log in 7.0:
New LNG file
More vivid colours
Night Photos improved
Fixed Video mode bugs e.g. darkness in 352x288 mode.
Added Video Night Mode in Manual Settings (2) Tab (Original Night Mode is higher resolution mode)
Two New Manual Functions: Advanced Manual Hue, Auto-exposure lock.
Change-log in 6.5:
*Record in two video resolutions with one driver
To record in 320 x 240 , just switch to video mode without Night Mode and record
To record in 352 x 288, turn Night Mode on by pressing 6 button.
*Changed Manual Colour Correction codes:
You can now mix different shades to add better colours to your images!
(I planned a tutorial for this but sadly there's a problem with my ISP and i can't use any upload service)
*More colours in all scenes
*Changes in twilight Portrait mode to make it less slow.
-------------------
[size=4] Thread History:[/size]
Cybershot Xperience series
Released CX 1.0
Released CX 1.2
Released CX 1.5
Released CX 2.0
Released CX 2.5
Released CX 3.0
Released CX 3.5
Released CX 3.7
Released CX 4.0
Released CX 4.1
Released CX 4.5
Released CX 4.7
Released CX 5.0
Released CX 5.1
Released CX 5.5 - First A2 super-mode driver
Released CX 6.0
Released CX 6.3
Released CX 6.4
Released CX 6.5
Released CX 7.0
Released CX 7.2
Released CX 7.5
Released CX 7.7
Released CX 8.0
Released CX 8.3
Released CX 8.5
Released CX 9.0
________________
NOTE:
Using Cybershot Xperience is not at all difficult, as it might seem.
It is very user-friendly and convenient in usage.
Moreover, when you upload the language file provided with the driver into the required directory, you'll get a new interface with HELP and Info available for each Setting in the driver, and you won't even need to memorize or keep in mind the locations of different manual settings in the driver.
Using Manual settings will help you in getting great shots. Professional and advanced photographers will most certainly benefit to it.
However, if the user does not wish to bring them into use, just keep in mind that Cybershot Xperience is still an excellent point-and-shoot camdriver.
Keep all settings at Auto and shoot away.
USING IN AUTO-SCENE:
___________________
Outdoors:
Use in Auto-mode, turn Flash and Colour Correction to AUTO by # key to Turn Colour Correction on.
If you prefer less vivid colours, you may turn colour correction off by turning flash off.
Indoors:
Turn Flash off or on as you desire and simply capture a pic.
-------------------------------------------------------------
Complete list of Manual Settings:
_________________________________
*Default EV Control has been changed to ISO control (for flash shots) and Shutter Speed Control (for non-flash shots) so you can now simply raise Flash Exposure and ISO by raising EV in normal mode. This makes it a very easy and quick way for using flash ISO of your choice. Shutter-speed for non-flash shots can be changed in a similar way.
*Flash Shutter-speed control
Select RER flash and balance Shutterspeed by EV buttons
*Record videos in two different resolutions!
To record in 320 x 240 , just switch to video mode without Night Mode and record.
To record in 352 x 288, turn Night Mode on by pressing 6 button.
Night Mode has been replaced with Higher Resolution code. Original Night Mode settings are still available. To shoot with Night Mode, go to Manual Settings (2) Tab and select Video Night Mode.
In Effects menu, the Manual Settings implemented are:
*Manual Focus (Previously Black and White)
*Manual Contrast (Previously Negative)
*Manual Saturation (Previously Sepia)
*Selection of ISO with EV values (Previously Solarize)
In White Balance menu, the Manual Settings implemented are:
*Night Mode for Video Mode (Previously Daylight)
*Manual Colour Balance between Cyan and Red (Previously Cloudy)
*Manual Colour Balance Between Yellow and Purple (Previously Fluorescent)
Selection of Effects, White Balance (Previously Incandescent)
In ISO Menu, the Manual Settings implemented are:
*Manual Shutter-speed
*Manual Tint/Hue (Previously ISO100)
*Manual Sharpness (Previously ISO200)
*Auto-exposure Lock (Previously ISO400)
In Scenes menu, the Manual Settings implemented are:
* Manual Shutter-speed for both for Flash and non-flash (Previously Twilight Portrait)
* Two Shutter-speed value modes.
Fast Shutter (At Sports Mode)
Slow Shutter (At Beach and Snow Mode)
-------------------------------------------------------------
Using Manual Settings:
______________________
First of all, upload en.lng (or the edited language file you use with your phone) to tpa/preset/system/language
This will:
*Change Text in Camera Interface according to driver.
*Add brief Tutorial/Help in camera interface for each Manual Setting used in the driver.
________________
To use ISO (Light Sensitivity) Control:
For Flash Shots:
In auto-mode, simply raise or lower EV to control ISO. So it is very easy to control flash exposure with this driver!
-2.0 = ISO 100
-1.7 = ISO 100
-1.3 = ISO 100
-1.0 = ISO 125
-0.7 = ISO 160
-0.3 = ISO 200
0.0 = AUTO
+0.3 = ISO 250
+0.7 = ISO 320
+1.0 = ISO 400
+1.3 = ISO 500
+1.7 = ISO 640
+2.0 = ISO 800
USE OF ISO in Flash:
Raising ISO for flash will increase exposure when you need to get brighter flash photos.
Use low ISO for macro shots and moderate for distant shots.
For Non-Flash shots:
Switch to ISO in Manual Settings 1 Tab
-2.0 = ISO 100
-1.7 = ISO 100
-1.3 = ISO 125
-1.0 = ISO 160
-0.7 = ISO 200
-0.3 = ISO 250
0.0 = AUTO
+0.3 = ISO 320
+0.7 = ISO 400
+1.0 = ISO 500
+1.3 = ISO 640
+1.7 = ISO 800
+2.0 = ISO 1000
USE OF ISO for non-flash shots:
ISO can help you in obtaining correct exposure.
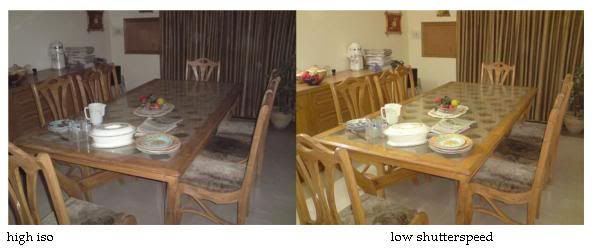
LOW ISO outdoors will give you more saturated and vivid colours. Image will be sharper as well, but in low light environments, a lower ISO would cause the image to become VERY underexposed.
HIGH ISO outdoors should be used for portrait photography; it will give you softer facial tone and sharpness.
________________
To use Shutter-speed control:
In photography, shutter speed is a common term used to discuss exposure time, the effective length of time a shutter is open; the total exposure is proportional to this exposure time, or duration of light reaching the film or image sensor.
For non-flash shots:
Shutter-speed control has been shifted to Twilight Portrait Scene. Use EV to customize it.
Slower Shutter = Longer exposure time = More exposure
EV = -2.0 (Fastest Shutter)
EV = +2.0 (Slowest Shutter)
More precisely:
- 2.0 = 1/6400s or 1/5000s
- 1.7 = 1/3200s
- 1.3 = 1/1250s
- 1.0 = 1/640s
- 0.7 = 1/250s
- 0.3 = 1/125s
0.0 = 1/50s
0.3 = 1.25s
0.7 = 1/10s
1.0 = 1/5s
1.3 = 1/2s
1.7 = 1s
2.0 = >1s
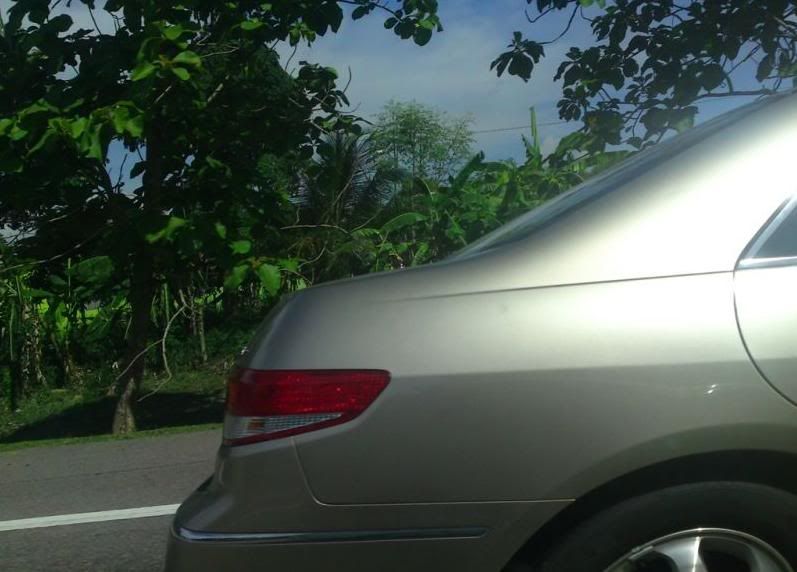
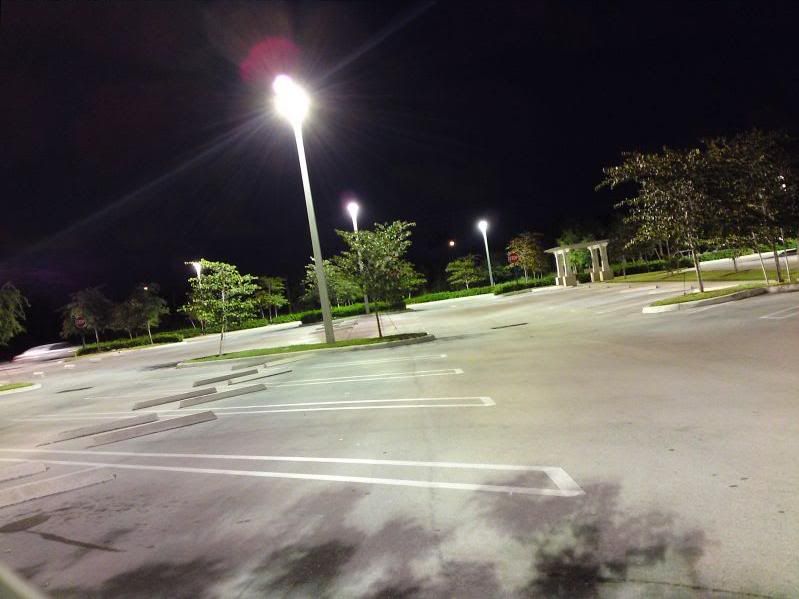
Two extra Shutter-speed modes are also available.
Fast Shutter (At Sports Mode)
Sample shot: Picture captured of a car at 110 km/h:
Slow Shutter (At Beach and Snow Mode)
Sample shot: Night view
For Flash shots:
Select RER flash and balance Shutterspeed by EV buttons.
EV = -2.0 (Fastest Shutter)
EV = +2.0 (Slowest Shutter)
Increasing slow shutter for flash will be VERY effective in getting more exposure in flash shots, a better way than raising ISO, but ONLY when a light source other than the cameras Xenon flash is present.
e.g. in the following shot, a light bulb was lit when the flash shots were taken.
To use Manual Focus:
Go to the last tab in camera menu labelled Manual Settings (1).
Select Focus.
Use D-pad to change EV value. EV value will change lens position rather than exposure, so you can focus manually
Hint: Zooming in a little while focusing will help in better location of exact focus point. You can zoom out again when you�ve focused.
-2.0 = 0 Focus steps (Infinite)
-1.7 = 4
-1.3 = 8
-1.0 = 12
-0.7 = 16
-0.3 = 18
0.0 = 20
+0.3 = 22
+0.7 = 24
+1.0 = 26
+1.3 = 28
+1.7 = 30
+2.0 = 32 (Closest focus step)
USE OF MANUAL FOCUS:
You may wonder why you should ever bother using manual focus if your digital camera has auto focus. Isn't auto focus much easier to use and always provides the right focal distance for your photos?
Unfortunately, auto focus is not perfect. Difficult lighting situations, subjects that are very close or very far away, bright or shiny objects and conflicting focal points may result in your digital camera auto-focusing incorrectly or unable to do so at all. You may need to compensate for this by using your manual focus ring.
Also, you may want to intentionally blur a photograph for artistic effect. In this case you will need to slightly defocus your photograph manually.
________________
To use Manual Contrast:
Go to the last tab in camera menu labelled Manual Settings (1).
Select Contrast Change EV with D-pad to change contrast and to level your pictures manually.
EV = -2.0 (Black Contrast)
EV = +2.0 (White Contrast)
USE: Sometimes you require slightly more or less white in your snapshots, particularly indoors. This is where you may need Manual Contrast.
________________
To use Manual Saturation:
Go to the last tab in camera menu labelled Manual Settings (1).
Select saturation
Change EV to change Saturation.
EV = -2.0 (Minimum Saturation or Black and White pictures)
EV = + 2.0 (Maximum or insane Saturation)
USE:
Manual Saturation helps in getting better and more colourful photographs of landscapes. Sometimes you may need to lower saturation too (e.g. when photographing intensely brightly coloured objects which appear without details on camera, or when taking portrait shots)
________________
To use Effects:
Go to Manual Settings (2).
Select WB and Effects
Effects:
0.0 = None
-0.3 = False Colours
-0.7 = Negative
-1.0 = Black and White
-1.3 = Sepia
-1.7 = Solarize
USE:
False colours changes the colour tone of many shades.
Negative effect reverses the colours.
Solarize effect works best with backlit images, where the foreground image is too dark to be clear. Solarizing lightens up the darker parts of the image without giving them a washed out-look, and it takes the lighter elements and makes them into a color negative.
Sepia and Black and White effects give the photos an old fashioned look.
________________
To use Manual Colour balance:
Go to the second-last tab in camera menu labelled Manual Settings (2).
Balance Cyan-Red or Yellow-Purple as you desire.
Configure with EV as below.
EV = -2.0 (No extra colour)
EV = -1.7 to 0.0 (First Colour intensity. Max at 0.0)
EV = 0.3 to + 2.0 (Second colour intensity. Max at 0.3)
You may Mix colours between the Colour Balance settings.
USE:
Manual Colour balance can help you in obtaining camera effects which are not possible with ordinary camera colours.
e.g. to shoot in a scary night film-like view during daylight, set colour to blue and reduce exposure to give a dark blue mystic shade.
________________
To use Manual White Balance:
Go to the second-last tab in camera menu labelled Manual Settings (2).
Select White Balance.
WB:
0.0 = Auto
0.3 = Daylight outdoor
0.7 = Cloudy outdoor
1.0 = Fluorescent
1.3 = Incandescent
USE (Source: http://digital-photography-school.com/intr...white-balance):
At its simplest � the reason we adjust white balance is to get the colors in your images as accurate as possible.
You might have noticed when examining shots after taking them that at times images can come out with an orange, blue, yellow etc look to them � despite the fact that to the naked eye the scene looked quite normal. The reason for this is that images different sources of light have a different �color� (or temperature) to them. Fluorescent lighting adds a bluish cast to photos whereas tungsten (incandescent/bulbs) lights add a yellowish tinge to photos.
The range in different temperatures ranges from the very cool light of blue sky through to the very warm light of a candle.
We don�t generally notice this difference in temperature because our eyes adjust automatically for it. So unless the temperature of the light is very extreme a white sheet of paper will generally look white to us. However a digital camera doesn�t have the smarts to make these adjustments automatically and sometimes will need us to tell it how to treat different light.
So for cooler (blue or green) light you�ll tell the camera to warm things up and in warm light you�ll tell it to cool down.
Adjusting White Balance
Different digital cameras have different ways of adjusting white balance so ultimately you�ll need to get out your camera�s manual out to work out the specifics of how to make changes. Having said this � many digital cameras have automatic and semi-automatic modes to help you make the adjustments.
Preset White Balance Settings
Here are some of the basic White Balance settings you�ll find on cameras:
- Auto � this is where the camera makes a best guess on a shot by shot basis. You�ll find it works in many situations but it�s worth venturing out of it for trickier lighting.
- Incandescent � this mode is usually symbolized with a little bulb and is for shooting indoors, especially under tungsten (incandescent) lighting (such as bulb lighting). It generally cools down the colors in photos.
- Fluorescent � this compensates for the �cool� light of fluorescent light and will warm up your shots.
- Daylight/Sunny � not all cameras have this setting because it sets things as fairly �normal� white balance settings.
- Cloudy � this setting generally warms things up a touch more than �daylight� mode.
- Flash White Balance (ADAPTED IN CX for flash shots at different ISO�s) � the flash of a camera can be quite a cool light so in Flash WB mode you�ll find it warms up your shots a touch.
To use Manual Hue:
Go to the tab in camera menu labelled Manual Settings (3).
Select Colour Hue.
This is not an original property of the driver but is a manipulation of colour correction codes to produce a variety of light shades/tints to enhance a specific colour you want to be exposed most prominently.
-2.0 = No tint
-1.7 = Purple/Magenta
-1.3 = Blue
-1.0 = Cyan
-0.7 = Green 1
-0.3 = Green 2
0.0 = Off
+0.3 = Yellow
+0.7 = Deep Yellow
+1.0 = Orange
+1.3 = Red
+1.7 = Deep Red
+2.0 = No Tint
USE:
This can be used to enhance the colours or shades in a particular photo, or to give the photos a slight tint.
________________
To use Manual Sharpness:
Go to the tab in camera menu labelled Manual Settings (3).
Select Sharpness and balance it by EV buttons
EV = -2.0 (Minimum)
EV = +2.0 (Maximum)
USE:
Sometimes you might need to show more details in macro shots or text documents etc, in these cases, manual sharpness can be used.
More sharpness can sometimes result in more noise.
________________
To use Manual Auto-exposure lock:
At EV = 0.0, Auto-exposure lock is turned off. Point camera towards any object and then change the EV to any value other than 0.0 to lock Auto-exposure.
USE: (Source: http://www.best-family-photography-tips.co...osure-lock.html)
This feature generally uses some type of "switch" that locks the exposure for the shot, after the initial reading has been made.
Normally, your camera determines the proper exposure automatically, based on several factors such as the lighting conditions, F-stop, and type of metering used.
By not "locking in" the exposure, the camera will re-calculate it, based on changes to the above factors.
Why is Camera Auto Exposure Lock important?
One of the main reasons you would want to use exposure lock is when taking a photograph of a scene with significant differences is shadow, light, and contrast. Depending upon the metering mode used, your camera will attempt to "average out" the exposure for the entire photo. Normally this is great. However, not every time.
For situations where you want to emphasize a specific part of the picture, or change the composition to get creative, an "averaged exposure" just won't do. You can also manually control the exposure through exposure compensation, but using that approach is pretty much trial and error.
That is why your camera auto exposure lock (or, "AE-Lock") should be the preferred method. It is far more accurate.
Another reason to use auto exposure lock is to "freeze" or "lock in" the same exposure parameters. When and if you become interested in "stitching together" several photos to create one large panorama, you will want to lock your exposure. When AE Lock is used, all settings for aperture, shutter speed, exposure and white balance are kept identical until you unlock them.
Besides, it can help you take great panorama shots. Normally the exposure of the three sections does not seem to match each other, but with AE Lock, that bug can be overcome.

_______________
Here are few sample shots through my drivers.


Download:
Cybershot Xperience 9.0
Please do not upload it again here or somewhere else, give this link instead.
[ This Message was edited by: witchking on 2010-06-09 17:44 ]
Posted by corer
there u go~
great job really
Posted by rogeri3
Well Done Man!!!!!!!!!!!!!!!!!!!!!!!
Posted by ceaser2008
Welcome to esato, witchking.
Thanks for the great work, i am getting used to these manual settings.
Posted by 20071123
wow~I`ve tried it ~It is amamzing~thanks witchking~but sometimes I can`t open the camera.....how to slove it?
Posted by witchking
@corer, rogeri, strong
Thanks
Posted by 20071123
On 2009-06-18 05:00:16, witchking wrote:
@corer, rogeri, strong
Thanks
witchking your drive is so amazing~can u plz tell
me how to Manual shutter and if I open flash, I can shoot a more colourful picture?
thx ~sorry for my poor english...
Posted by cyber-shoter
WOW!!!!! VERY NICE!!!! GREAT wORK MAN!!!!
finally K850 has super mode camdriver
maybe K850 will be my next camera phone
Posted by witchking
20071123
What do you mean you can't open camera? Never faced this problem.
Use Red Eye Reduction mode and balance shutter-speed by EV. You'll find it satisfactory
Posted by witchking
v6.4 with some minor improvements available already.
See link in first post.
Posted by 20071123
oh~It`s so quikly~
thx for u let k850 more perfect~
Posted by witchking
The new version has got better flash ISO and more vivid colours.
Posted by 20071123
I got it ~could you set manual contrast in a number button? like open flash ~I think it will make the setting faster and easier~
Posted by witchking
ISO control is used in Auto Flash mode. Thats more useful for most people than Manual Contrast. Select it from Manual Settings tab mate. Its convenient.
Posted by 20071123
hummmmmm~I see~
Posted by ds934118
How to adjust the shutter speed?
Open the flashing lamp then adjust with EV?
But the not all right control ISO like this
Posted by witchking
Switch to RER Flash, then adjust shutter-speed with EV
Posted by witchking
Really lacked times because its been a VERY busy weekend but got few moments to upload this:
New version ready
Once again, Cybershot Xperience is the first driver to bring in further manual customizations for A2 models.
Change-log:
*Record in two video resolutions with one driver smile.gif
To record in 320 x 240 , just switch to video mode without Night Mode and record
To record in 352 x 288, turn Night Mode on by pressing 6 button.
*Changed Manual Colour Correction codes:
You can now mix different shades to add better colours to your images!
(I planned a tutorial for this but sadly there's a problem with my ISP and i can't use any upload service)
*More colours in all scenes
Changes in twilight Portrait mode to make it less slow.
---------
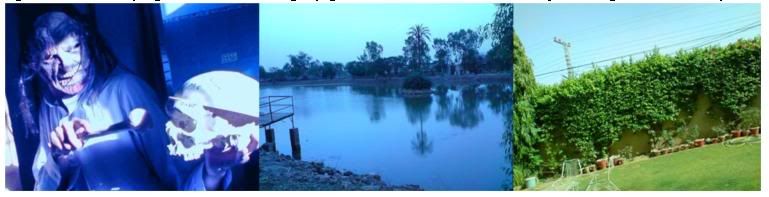
Manual Colour Correction used wisely can improve shades of colours. Select the colour you want to make most prominent and balance it by EV. Then photograph:
Blue tint:
Yellow tint to enhance green:
Mix Cyan and Yellow:
Red tint:

You may add special effects in your pics e.g. i did this to make my mask pic look scary
(Its improperly focused so its blurred)

--------------
Posted by 20071123
Posted by firoz3321
what mobiles does this support ?
Posted by Junz
K850i
Posted by firoz3321
oh
Wrong area for me.
Posted by Milan188
Is it possible to increase the smoothness of the change of EV...has anyone notice this when u change the EV or is it just me
Posted by witchking
This driver uses a different mode for exposure in which each exposure step controls several manual functions. That's why you feel this.
Posted by Milan188
Oh i c...anyways big ups to you for creating such an awesome driver
Posted by MiHaU
Is it possible to try these settings in the c902 phone?
By writing this I meant to make similar driver for the c902 phone.
[ This Message was edited by: MiHaU on 2009-06-27 00:10 ]
Posted by delro7
Can it also produce good pics in Point and Shoot mode?
[ This Message was edited by: delro7 on 2009-07-02 09:52 ]
Posted by ceaser2008
Yes, it can take good pic in point and shoot mode.
Posted by SAG4
Somebody have the orginal en.lng file for k850i???.. i change my camdriver for this "cybershot xperience" but don't like it and now i back to "jupita rev3" camdriver and the lenguage from my cam it's wrong now..
the file is in: tpa/presets/settings/language/en.lng
Thx!
Pd: sorry for my english, i'm speak spanish jeje
[ This Message was edited by: SAG4 on 2009-07-05 08:44 ]
Posted by iHeartSE
Posted by Navar
@heartse for me CYBERSHOT XPERIENCE for K850i v6.5 is great becuz u can do whatever u like with it. but u must know how to use it
Posted by iHeartSE
@Navar - Enjoy! No doubt it's good, not complaining! To each his own! Long live SE
Posted by SAG4
On 2009-07-05 20:20:35, Navar wrote:
@heartse for me CYBERSHOT XPERIENCE for K850i v6.5 is great becuz u can do whatever u like with it. but u must know how to use it
Thx man.
Posted by Navar
@SAG4 you are welcome
Posted by witchking
New version 7.0 attached in first post
Posted by norbi1988
oh great
Posted by iHeartSE
Posted by witchking
Thanks to you all for appreciation
Posted by turboexcess
the best one i have tested
Posted by ceaser2008
Actually, CX v7.2 is also out. You can find the link and change log from the link in the first post by witchking.
Posted by salimbaba
somehow im still gettting overexposed pics when using flash =( i've started to hate my k850...you ppl are getting great results from it but i'm getting nowhere near them =( ...
Posted by bluechip
On 2009-07-17 08:25:32, salimbaba wrote:
somehow im still gettting overexposed pics when using flash =( i've started to hate my k850...you ppl are getting great results from it but i'm getting nowhere near them =( ...
hi salimbaba,
may i know which cam driver are u using?
ur firmware?
ur way of taking photos (like auto/manual etc)
maybe i can help u....
and btw dont hate ur k850i, its still the best phone...
thanks..
Posted by salimbaba
hey bluechip,
cam driver = CX 7.2
firmware = r1fa035
i've tried auto n manual both...but i get overexposed pics in both cases =(
yeah i know its a great phone....
Posted by ceaser2008
Salimbaba, have you tried cleaning your light sensor with wooden toothpick. Make sure you clean it properly. Secondly, make sure, you dont cover the flash or light sensor with your hand.
Posted by salimbaba
ceasar2008,i have already done that...and my hand doesn't come in the way...i dont know what is wrong with it =\\ i've tried every cam driver available on internet,bt no sir,i just cant get rid of it =(
Posted by bluechip
On 2009-07-18 19:36:30, salimbaba wrote:
ceasar2008,i have already done that...and my hand doesn't come in the way...i dont know what is wrong with it =\\ i've tried every cam driver available on internet,bt no sir,i just cant get rid of it =(
ok salimbaba,
i'll suggest you a solution to your prob.
its a bit kindof unsystematic but u can try it...
get a white paper tape, cut a small portion to correctly cover the flash, and stick on it.
try taking a pic. if the result is negative, stick one more on top of it and try...
I personaly tried it and got good result. But there is a catch...
the flash doesnt go beyond 1 meter or so,
so if your subject is a little far you would get it dark.. (all this is for nightshots ok)
try it....
Posted by salimbaba
thanks bluechip...i'll try it asap ...and sometimes unsystematic ways work a lot better than the systematic ones
Posted by salimbaba
hey bluechip...i tried that...and well on auto, i get better pics than before but in twilight portrait mode,the pics are still overexposed to some content ...
Posted by bluechip
On 2009-07-19 14:49:46, salimbaba wrote:
hey bluechip...i tried that...and well on auto, i get better pics than before but in twilight portrait mode,the pics are still overexposed to some content ...
thanks 4 trying..
but it cleared ur problem to some extend right?
still u can experiment with it...
Actually the problem may be with the flash. I think its producing more than needed light.
I tried with my N82, and it doesn't. The pictures are fine.
maybe someone comes with a way to reduce the intensity of flash light or to control it....
Posted by salimbaba
yeah i think something's wrong with its flash...everytime i take a pic,the flash goes off like hell =p