| Author |
Modded Camera Driver for Sony Ericsson k850 |
brazzuka's
Joined: Nov 14, 2007
Posts: > 500
From: South World-Antartida-Sweden
PM, WWW
|
For all developers modders and users
Here you can find Modded Camdriver for Sony Ericsson k850 model Sony_MCB991 5MPixel and model Premier and Foxconn Secondary Videocall Camera
K850 Cyber-shot phone
The K850 Cyber-shot phone features a 5 megapixel camera with the next generation camera UI and media browser, and the innovative photo auto-rotate feature displays pictures in the correct aspect (portrait or landscape) irrespective of the orientation it was taken in. This HSDPA/UMTS phone includes a 320x240 pixel 262K TFT display, Memory Stick Micro removable storage, picture and video blogging, full HTML browser benefiting from HSDPA broadband speed, and impressive music and video players.
The K850 is based on Sony Ericsson's Java Platform 8 (JP-8), supporting Mobile Services Architecture (MSA) JSR 248, the next-generation Java umbrella standard. MSA aims to reduce fragmentation in the industry by creating a predictable environment for developers, reducing porting issues when developing new applications and games for the new generation of phones.
How To Take Better Photos With Camera Cellphone
Nowadays, camera cellphones are very common and lots of folks are using their camera phones to capture photos/pictures, which has developed into a global phenomenon. As you know, take pictures by camera phone (hybrid device) is more challenging if compared to digital cameras that designed specially for capturing your valueable memories. For your need, here�s got some tips that will help you to take better photos with camera handset.
Tips To Take Better Photos (Camera Phone):
* Set the most suitable settings: Before you start to take pictures, set the settings such as weather and lighting environment (if your phone have).
* Hold your camera phone steady: As you know, the lens on a camera phone is smaller than digital cameras, so it�s very prone to camera shake. The images will result in blurry shots if you inevitably move the phone just a bit. This is especially important in low light situations.Try to stand as steady as possible.
* Watch the light: Not only refers to the quantity of light, but also how the light is arranged. Be especially mindful of where your primary light source is.
* Get close: Get as close as possible when a scene is backlit, because the resolution just isn�t there to handle foreground. In addition, this also reduces the effects of camera shake.
* Pose people: Less movement of object you focus will result in clearer shots.
* Edit later: You can edit the photos with built-in image editing software (if got) in camera phones. Instead, download your photographs to your computer and use Photoshop software.
* Keep your lens clean and free from scratch: You can purchase a good case to protect your phone.
* Select the highest resolution when you plan to print a picture: Don�t choose VGA resolution which is best for web when wanna print out a photo.
* Take lots of pictures: Provides yourself as many options as possible, it�s not analog but digital.
* Don�t use your digital zoom: It will decrease the quality of your photoshots.
Now, you can try to capture photos with your beloved camera phone using the tips/guides above.
Scene modes
Digital cameras offer a variety of useful modes, which are optimized for specific scenes and photographic conditions. Scene modes are preprogrammed by the manufacturer to automatically give the best exposure and settings for each scene.
When selected, a scene mode can often give better results than shooting in fully automatic mode.
Common digital camera scene modes:
Backlight - eliminates dark shadows when light is coming from behind a subject, or when the subject is in the shade. The built-in flash automatically fires to "fill in" the shadows.
Beach/Snow - photograph beach, snow and sunlit water scenes. Exposure and white balance are set to help prevent the scene from becoming washed out looking.
Fireworks - shutter speed and exposure are set for shooting fireworks; pre-focusing & use of tripod recommended.
Landscape - take photos of wide scenes. Camera automatically focuses on a distant object.
Macro - take close-up shots of small objects, flowers and insects. Lens can be moved closer to the subject than in other modes. Hold the camera steady or use a tripod.
Night Portrait - take photos of a subject against a night scene. The built-in flash and red-eye reduction are enabled; shutter-speeds are low. Use of tripod recommended.
Night Scene - photograph nightscapes. Preprogrammed to use slow shutter speeds. Use of tripod recommended.
Party - take photos in a dim lit room; exposure and shutter speed are automatically adjusted for room brightness. Captures indoor background lighting or candlelight. Hold the camera very steady when using this mode.
Portrait - main subject is clearly focused and the background is out of focus (has less depth of field). Best when taking shots outside during the day. Shoot using a mid to long telephoto lens, stand close to your subject within the recommended camera range and, when possible, select an uncomplicated background that is far from the subject.
Sports (also called Kids & Pets)- take photos of a fast moving subject; fast shutter speeds "freeze" the action. Best when shots are taken in bright light; pre-focusing recommended.
Sunset - take photos of sunsets and sunrises; helps keep the deep hues in the scene.
Advanced techniques digital camera and camera mobile phone
AE-lock and AF-lock:
Digital cameras are set to default to lock focus and exposure together when the shutter release button is pressed halfway. Some digital cameras have a feature to lock focus and exposure independently.
AF-lock: controlling focus
Gain more control over where the camera focuses when you depress the shutter-release button half-way. Say you want to focus on the subject that is off to one side in a scene. Move your digital camera so the focus area indicator is on the subject. Then press the shutter-release button down half way to lock focus. While holding the button in this position, recompose and then fully depress the button to take your shot. This helps ensure that the main subject is in sharp focus rather than a random object selected by the camera.
AE-lock: controlling exposure
Obtaining better exposed photos in difficult lighting situations involves moving the camera to the main area you want properly exposed. It should of equal distance as the subject since the shutter-release button controls focus too. For example, if you want to capture detail in an area that would otherwise come out dark, lock exposure on the area, recompose and press the shutter-release button all the way down.
Adjusting ISO:
Digital cameras are usually set by default to automatic ISO. The camera automatically sets the ISO according to light conditions: the brighter the light, the lower the ISO; the lower the light, the higher the ISO.
Many users prefer to manually adjust the camera's sensitivity to light. It gives them some control over the amount of noise that may appear in an image. In some cases, you can avoid using the flash by increasing the ISO.
ISO and noise
On many consumer digital cameras, selecting an ISO number above 100 produces little visible noise. Test each ISO number under a variety of lighting conditions until you become familiar with the noise your camera produces at each setting.
If images are noisy, noise reduction programs do an effective job at eliminating some of it, though fine detail may be sacrificed.
Low ISO settings (ISO 50-100)
-More light needed
-Less noise
-More image detail
-Larger aperture +/or longer shutter speed
High ISO settings (ISO 200 and above)
-Less light needed
-Increased noise
-Less image detail
-Smaller aperture +/or faster shutter speed
When deciding whether or not to use an high ISO number, keep in mind that the visual presence of noise is often barely noticeable when images are reduced in size for printing and/or viewing on a computer.
Barrel distortion:
Barrel distortion occurs when taking photos at the widest angle of a lens. The position of the camera lens causes images to look outwardly curved or skewed when straight edges are near the side of the frame. Lines that you'd expect to appear perpendicular are not.
While not all barrel distortion looks bad and may even be desirable at times, you can minimize its effect by moving back and zooming in instead of standing close and shooting at wide angle. Use a focal length of about 50mm (35mm equivalent). Watch the LCD for distortion as you zoom or change your physical distance from the set-up. If things appear distorted, move back from the subject and zoom in.
Have funny looking curves or skewed lines at the edges of your wide-angle photo? The culprit causing this is called barrel distortion.
Barrel distortion can be improved, often significanlty, by using any photo editing program that has tools to correct camera lens distortions. Photoshop was used to illustrate this tutorial, but other photo editing programs have similar tools. Check your software's HELP menu as the tool may be located under a different menu, or called by another name.
Depth of field (DOF):
Depth of field (DOF) refers to how much of a photo is sharp in front and back of where you focus on the main subject. DOF is primarily controlled by aperture size though other factors come into play such as the focal length of the lens.
More (deep) DOF
Deep depth of field means that all or most of the picture is in focus from front to back. It is often used for capturing subjects in the distance, such as in landscape scenes. The further away your camera is from the subject, the greater the depth of field. Higher f-stop numbers obtained by using smaller apertures produce deep depth of field. Short focal lengths (when lens is set at wide angle) help increase depth of field.
Less (shallow) DOF
Less depth of field means a subject is in focus but objects in front and behind it appear out of focus. Less DOF is often desired when taking portrait, close-up and macro shots. Lower f-stops (larger apertures) decrease DOF. Long focal lengths (zooming in) produce less DOF. With a digital camera, you can also make the background appear out of focus by placing the subject close to the camera and having the background far away.
If you can't manually control aperture, use portrait mode for shallow depth of field. For deep depth of field, use infinity mode.
Depth of field quick guide:
Depth of field (DOF) is primarily controlled by aperture size. Other factors also come into play such as the focal length of the lens.
To increase DOF
For distant subjects
Higher F-stop numbers (smaller apertures)
Shorter focal lengths (wide angle)
To decrease DOF
For close-ups
Lower F-stop numbers (larger apertures)
Longer focal lengths (zoomed in)
Exposure bracketing:
Photo enthusiasts and professionals have long relied on a technique known as exposure bracketing. Bracketing helps ensure correct exposure of a photo when lighting in a scene is difficult.
Extremes in light can trick a camera meter to improperly exposing a photo. Bracketing overrides the exposure settings.
Bracketing can be set manually on some cameras. More often that not, digital cameras can be set to bracket automatically.
When auto exposure bracketing is enabled, the camera takes two to five consecutive pictures of the same scene. The Exposure Values automatically change in plus and minus incremental steps.
Back-lighting
The first three shots were taken with the source of light coming from behind the subject. This is known as back-lighting. Without changing the Exposure Value from the default exposure reading, back-lighting causes the main subject to be under exposed, ie. dark.
Front-lighting
The next three shots were taken when the main source of light fell on the front of the subject. The strongest light came from behind the person taking the picture.
Without adjusting the Exposure Value when light falls too strong on a subject, the image becomes overexposed. What results is an photo with washed out, blown out areas.
Better to under than overexpose
It is generally better to under- rather than overexpose an photo. When editing, it is often possible to pull out detail from the darker, underexposed areas.
When portions of an image are washed out due to overexposure, there remains little or no detail to pull out in the blown-out area. In difficult lighting situations, he use of exposure bracketing usually saves the day.
Exposure value (EV):
A cameras metering system can be fooled when taking pictures where large areas of a scene are very bright, very dark or contain strong contrast. To help prevent a photo from under or over exposure, adjust exposure values (EV).
Exposure values, represented by numbers with a plus or minus in front of them, override settings automatically selected by a cameras exposure mode. When the main subject is darker than the background, increase exposure value. If the subject is much lighter than the background, decrease exposure value.
Suggested exposure value settings*
* Bright sunlight coming over the back of you when taking a photo: -0.3 or -0.7 EV compensation
* For shots with strong light coming behind the subject (back lit): +0.7 or +1.0 EV
* Scene with bright sun: 0 to -2 EV
* Snow, beach or highly reflected water: -2/3 to -2 EV
* Close-up of white or yellow flower: -1/3 to -1 EV
* Dimly lit night sky: 0 to +2 EV
* Land or seascape taken just prior to dusk: 0 EV to +2/3
* Very dark or black objects: + 2/3 to +1 1/3
* Settings can vary not only with the scene, but with the digital camera you're using.
Histogram:
Many digital cameras have an histogram that is viewed on the LCD or electronic viewfinder. It indicates whether or not an image is properly exposed. The histogram shows if an image is too dark (underexposed), too light (overexposed) or if the exposure is just about right.
The distribution of light and dark in an image is displayed on the histogram. Darker areas are shown to the left and bright areas to the right. A good exposure is indicated when mid-tones display approximately halfway between the darkest and brightest tones.
If the histogram shows that an image is not properly exposed, change exposure settings and retake the picture. If an image is too dark, adjust exposure compensation to the plus side. It it is too light, adjust exposure compensation to the minus side. For digital cameras without manual settings, lock exposure on another part of a scene, then recompose before shooting.
Many digtial cameras have a "live" histogram. Actual hanges in exposure can be seen on the histogram while framing a shot. Other cameras have histograms that can only be viewed in playback mode after an photo is taken.
Advanced photo editing programs have histograms. They serve as a guide during the editing process when adjusting the tonal range of an image.
Photo composition:
"You don't take a photograph, you make it." Ansel Adams
Photographs that stand out from the crowd usually have three elements in common: good subject, good lighting and good composition. What follows are principles of composition that explain some of the ways photographers and artists have composed images throught the centuries.
It's possible that a photo may include a combination of more than one principle. What's important to understand is that they are guides, not hard and fast rules, so experiment when framing your shots!
Principles of composition
These principles are illustrated in our Photo Composition Galleries.
* Center of interest: a photograph should have a strong focal point. Determine what it is before composing your photo.
* Simplicity: keep your composition simple, avoiding busy background that distracts from a subject.
* Subject off center: Place a subject slightly off-center rather than in the middle of a photo (see The Rule of Thirds)
* Horizon lines: Don't place the horizon line, or any strong vertical or horizontal lines, right in the middle of a picture. Make sure the lines aren't tilted!
* Leading lines: if a scene has strong lines, make sure the lines lead the eye into the frame rather than out of it. The lines should lead to the main point of interest.
* Foreground objects: Include an interesting object in the foreground of a scene. It adds depth, dimension and point of reference.
* Vary angles: Shoot at varying angles to capture a subject at a different viewpoint. Move the camera higher or lower than you usually do. For a dramatic effect, take some photos from a birds-eye (looking down) or worms-eyes view (looking up).
* Framing: Framing a subject by zooming or moving closer draws attention to it. Using foreground objects in a scene can add depth and point of reference.
* Silhouettes: Subject made dark by photographing it against a light background (back lighting).
* Reflections: adds an interesting, sometimes abstract, look to a photo.
* Symmetry: an identical or near-identical image of its other half. Use of symmetry often provides a formal balance.
Point and shoot creative effects:
If you have a point-and-shoot digital camera that has no manual or semi-automatic controls, you can still use it for creative photo effects. The techniques may not be as precise as manually adjusting aperture and shutter speed, but they can be quite effective with practice.
Digital camera scene modes have factory optimized settings for shutter speed, aperture, ISO, white balance, flash and sometimes even focus. By using an appropriate scene mode, depth of field can be adjusted for selective focus and shutter speed can be varied to capture motion.
You can also acheive some of these effects by changing the focal length or the distance the camera lens is from a subject.
Useful scene modes for creative control
Increased depth of field
Landscape or jnfinity mode - Camera automatically focuses on a distant object and maximizes depth of field. Use for photographing land, sea and city scapes and for shooting through glass and fences where focusing can be difficult.
Decreased depth of field
Macro mode - Uses a larger aperture. The amount of depth of field can be controlled by how close you hold the camera lens to the subject and by zooming in or out.
Portrait mode - Control depth of field by zooming in and out and by changing the distance the subject stands from the background. Depth of field decreases the closer a subject is to the background.
Increased shutter speed
Sports or kids and pets - Take photos of a fast moving subjects; fast shutter speeds are used to "freeze" the action. Obtain best results when this techique is used in bright light; pre-focusing recommended.
You can also up the shutter speed by increasing the ISO, however doing so may increase noise.
Don't forget
When using these techniques, use the two-step shutter release button correctly to lock focus and exposure. Stay within the recommend range if you use the camera flash.
Program shift:
For any given scene, there are usually multiple combinations of aperture and shutter speed that will deliver a correct exposure.
Some digital cameras with Program AE mode, where the camera selects the shutter speed and aperture automatically, allow the user switch between those combinations once the exposure has been evaluated (usually by half-pressing the shutter button). This is known as Program Shift
Program shift is useful because it lets the user�s creativity come into play in a simple and reliable way. It makes the selection of various aperture and shutter speed combinations easier for the photographer, while still ensuring accurate exposure.
For instance, a scene can be photographed with an f-number of f/2.8 and a shutter speed of 1/500 seconds. It can also be shot with an f-number of f/5.6 and a shutter speed of 1/125 seconds. The first settings combination allows for a shallow depth of field and makes it easier to photograph moving subjects. On the other hand, the latter settings ensure that more of the scene is in focus. But both images will be exposed similarly.
Check your manual for camera-specific instructions for using this very powerful, often overlooked, tool for photographers.
Shutter speed:
Shutter speed is the amount of time the shutter remains open to allow light to reach a digital camera sensor. Shutter speed is measured in seconds, or fractions of seconds.
Using very fast shutter speeds "freeze" fast-moving subjects, such as birds in flight. Slow shutter speeds are used to intentionally capture the movement of a subject.
How an image is exposed is determined by the combination of the lens aperture and shutter speed. A fast shutter speed will use a larger aperture (small F-stop number) to avoid an under-exposed image. A slow shutter speed requires a small aperture (large F-stop number) to avoid over-exposure.
Typical shutter speeds are: 1/2000 second, 1/2000 sec, 1/500 sec, 1/250 sec, 1/125 sec, 1/60 sec, 1/30 sec, 1/15 sec, 1/8 sec, 1/4 sec, 1/2 sec and 1 second. On some digital cameras you can manually set shutter speed a lot slower than a second for very long exposures.
Use a tripod when taking long exposures to prevent camera shake.
For most, hand holding a digital camera at shutter speeds below 1/60th of a second often require use of a camera support.
Shutter Priority Mode
Shutter Priority mode is a semi-automatic exposure mode. You select the shutter speed and the camera automatically sets the aperture for a proper exposure.
For digital cameras without Shutter Priority, use Sports, Kids and Pets or Fast Shutter mode.
Shutter speed chart:
The following are suggested shutter speeds to use when photographing a variety of subjects.
SUGGESTED SHUTTER SPEEDS
TO FREEZE ACTION*
Children - 1/250 - 1/1000 seconds
Moving water/waterfalls: 1/000 seconds or more
Sporting event: 1/500 - 1/2000 seconds
Birds in flight: 1/500th a second and above
TO CAPTURE MOTION**
Amusement park rides: +/- one second
Moving water/waterfalls: 4 or more seconds
Fireworks: 1/2 - 4 seconds
Moving cars at night: 8-10 seconds
Night photography - one or more seconds
* The closer action is to your digital camera, the faster the shutter speed is needed.
To help prevent images from becoming blurred, set the shutter speed faster than the focal length. For example, a zoom lens set at 200mm (35mm equivalent) requires a shutter speed of at least 1/200 second to avoid a blurred image.
** Tripod or other camera support recommended whenever using slow shutter speeds. Also use the self-timer or remote to trigger the shutter to prevent camera movement.
If your camera has Image Stabilization, most manufacturers recommend shutting it off when using a digital camera on a tripod.
Image Stabilization (IS):
Image Stabilization (IS), also known as vibration reduction and anti-shake, is a technology that helps prevent digital photos from becoming blurred. IS reduces camera shake caused by hand movement, slow shutter speeds or when using a long telephoto lens without a tripod.
Image stabilization is often found in consumer digital cameras with long telephoto zoom lenses. However it is available on an increasing number of cameras with short focal lengths. IS is also found on professional digital single lens reflex cameras, interchangeable lens and videocams.
IS helps a photographer take handheld shots almost two stops slower than without it. It is important to point out that Optical Image Stabilization does not prevent blur if a subject itself is moving.
Optical vs. Digital Image Stabilization
Optical Image Stabilization is hardware based. Digital cameras with optical IS typically have a built-in gyrosensor and microprocessor that detects camera shake as it occurs. The stabilizer compensates for any camera movement.
If your digital camera has Optical Image Stabilization, it's adviseable to keep it turned on at all times. However, most manufacturers recommend that it be turned off when a tripod or other camera support is used.
There are three types of Optical Image Stabilization modes, though not every compact digital camera with IS has all three: Continuous, Shoot Only and/or Panning.
Digital IS
Some cameras have Digital Image Stabilization, which simply boosts camera sensitivity (ISO) to obtain a faster shutter speed. No hardware is involved. Faster shutter speeds help prevent blur.
However, the higher the ISO, the greater the chance for noise that can degrade image quality. In some cases where digital image stabilization is used, in-camera processing corrects image blur, similar to when an image is sharpened with photo editing software. How effective in-camera sharpening is can vary.
Ask before buying
Words can be misleading. Terms such as Anti-blur Technology, Anti-shake Function and Image Stabilization Mode may simply mean that a camera increases the ISO (and therefore shutter speed) to help prevent blurred images.
If you want the benefits of optical Image Stablization, make sure a camera has IS that is hardware based.
Dual Image Stabilization
Dual Image Stabilization simply combines optical IS and an increase to ISO. Some cameras have a special dual IS mode. If a digital camera has image stabilization ISO can be increased manually.
Shutter speed effects:
Shutter speed can be used creatively to create special effects in photos.
To freeze action, use a fast shutter speed.
Exposure Time 1/121 sec Aperture f/4.3
To capture the feeling of movement, use a slow shutter speed.
Exposure Time 1/13 sec Aperture f/4.6
Panning
By tracking a moving subject, called panning, the subject stays in focus while the background is blurred. Panning requires practice. Make sure to lock focus on the subject. If your camera has a continuous mode or Panning Image Stabilization mode, use either or both.
Fully automatic options
If you can't manually control shutter speed:
* For freeze action - Sports mode
* For motion action - Night scene mode, which uses slow-synch flash (camera support recommended)
White balance:
The color of light reflected off a subject changes with the color of the main light source. The white balance setting on a digital camera adjusts the brightest part of a scene so it appears white. The human eye sees white objects as white regardless of the light source; a digital camera does not.
Digital cameras are set to automatic white balance by default. Automatic white balance does a very good job under most circumstances. However, there are times when white balance needs to be changed manually to match the inside or outside lighting in order to obtain more true-to-life colors in a photo.
Preset white balance settings:
*
Daylight - for direct sunlight
*
Cloudy - for shady, overcast skies
*
Fluorescent - for use under fluorescent lighting
*
Incandescent/tungsten - for use under standard light bulbs and some types of fluorescent lighting
*
Flash - for light produced by the built-in camera flash
Photos of a white door were taken under the same lighting conditions (standard light bulbs). Automatic white balance was used to shoot the image on the left image. Incandescent white balance setting was use for the image on the right.
White balance - custom:
You can more accurately control color and prevent a color cast in a photo by selecting a user-defined white balance. Many digital cameras have a Custom White Balance setting that is quite easy to use.
Factory preset white balance settings work well in a variety of lighting conditions. However when lighting is mixed, custom white balance is particuarly effective.
Use a white colored object
After selecting Custom from the white balance setting menu, point the camera lens at something white such as a piece of paper or white shirt. The camera will take a reading from the white object and adjust the white balance to the lighting in the room.
Accessing the custom white balance setting varies from one digital camera to another, so check the manual for specifics. Take a few test shots after the custom white balance is set and check them on the LCD.
When shooting with the Custom White Balance is complete don't forget to switch the camera back to Auto White Balance. The custom setting is usually saved until the next time you change it.
ISO (Sensitivity):
ISO is the number indicating a digital camera sensors sensitivity to light. The higher the sensitivity, the less light is needed to make an exposure.
Digital cameras automatically select the ISO but most have a setting to change it manually. Auto ISO generally works best for bright scenes.
Shooting at a lower ISO number requires more light than shooting at a higher number. Lower numbers result in images with the least visible noise, which is desirable.
The higher the number, the more noise. The amount and degree of noise varies from camera to camera.
Digital single reflex cameras (dSLR), because they have larger sensors, are best for producing noise-free images. However, some consumer digital cameras now have improved sensors that produce acceptable images at higher ISO.
ISO settings
AUTO ISO - digital camera automatically sets the ISO speed according the the brightness of the scene, increasing or decreasing the sensitivity. User has no control over which ISO number is used.
ISO 50 - 80 - for taking photos in bright light; excellent for close-ups, landscape, and portraits. Produces fine detail and image quality.
ISO 100 - for extra sensitivity with little, if any, reduced image quality.
ISO 200 - cloudy and overcast days. Acceptable image quality, with some visible noise.
ISO 400 and above - suitable for indoor photography whether or not a flash is used. Useful for "stop-action" and sports photographs. Most compact digital cameras produce high to very high image noise.
Changing ISO also changes the aperture and shutter speed.
Auto ISO mode
All consumer digital cameras have an Auto ISO mode. The camera automatically selects the sensitivity, known as ISO, according to the level of light in a scene. The user has no control over which ISO number is used.
In bright light a lower ISO will be selected. In low light an higher ISO number will be selected.
Auto High ISO Mode
Some digital cameras have an Auto High ISO mode, which is primarily used in very low and difficult lighting. The camera selects ISO number higher than Auto ISO mode, usually ISO 400 and above.
Higher ISO means faster shutter speeds
When a higher ISO is selected, shutter speeds are faster. Use of faster shutter speeds helps prevent blurred images due to camera shake. Using high ISO numbers also allows you to turn off the flash when shooting in dark areas.
Higher ISO means more image "noise"
Keep in mind that the higher ISO, the more noise will appear in images. That's why many photographers, in order to prevent noise, prefer to set ISO manually and select low ISO numbers even if they must use a tripod to prevent camera shake. Still, an photo with noise is better than no photo at all.
Image noise will be higher when using Auto High ISO mode than using Auto ISO mode.
Exposure modes
Exposure is the amount of light which falls upon the sensor of a digital camera. Shutter speed and aperture are adjusted to achieve optimal exposure of a scene. Most digital cameras offer a variety of exposure modes from fully-automatic to semi-automatic to full manual mode. Scene modes have factory optimized settings for different subjects and scenes.
Automatic Modes
When using a fully automatic mode, you simply depress the shutter-release button and the camera selects all settings depending on the type of lighting and brightness of a scene. The camera focuses automatically and, when light is low or insufficient, automatically fires the flash.
Digital cameras with Program AE mode set the shutter speed and aperture are automatically however the user can adjust some settings such as ISO and white balance.
Semi-Automatic Modes
You select the aperture (lens opening) and the camera automatically sets the shutter speed. Or select the shutter speed and the camera automatically sets the aperture.
Manual Mode
You have complete control by selecting both the shutter speed and the aperture. Digital cameras with manual modes have a manual assist indicator, or other means, which indicates whether or not the exposure is adequate.
Scene Modes
Scene modes let you choose from a variety of preprogrammed modes suitable to photograph a given subject such as a portrait, landscape or fireworks. The camera settings change when moving a dial to select the mode that matches the scene you plan to photograph.
Flash modes
Many digital cameras have several flash modes to choose from. A built-in flash is small and not very powerful so whichever mode you use, make sure to stay within the specified flash range.
Digital camera flash modes
* Automatic mode - flash triggers automatically. Turn this mode off when in places that forbid inside flash photography, such as museums and theaters.
* Red-eye reduction - fires the flash several times just just prior to exposing a photo. Reduces the reflection in a subject's eyes which produces red eyes. The rapid flashes cause a subject's pupils to contract and helps minimize the red-eye effect.
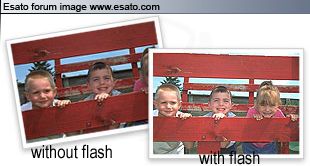
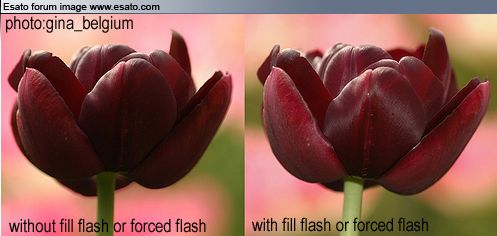
* Forced (fill-in) flash - keeps the flash on in situations where automatic mode would keep it off. Used when additional illumination is needed such as when the main source of light is in the back of a subject or shadows prevent details from showing.
* Suppressed flash - turns the flash off
* Slow sync (also called Night Scene)* - use to capture a dimly lit background at night. The flash fires briefly to light the foreground subject.
* Rear-curtain sync* - Similar to slow synch but flash doesn't fire until right before the shutter closes.
* Flash exposure compensation - used to increase or decrease the output of the flash.
*Tripod or other camera support recommended
Focus modes
Most consumer digital cameras often have more than one focusing mode. When using an automatic mode, focus is locked when the shutter-release button is pressed half-way down. Correct use of the two-step shutter button is key to obtaining proper focus.
The LCD or electronic viewfinder indicates when, and sometimes where, focus is locked. There is a visual indicator, such as a small lamp or change in color of the focus indicator, that confirms when focus is achieved.
Auto Focus
Single (or one) area focus - camera focuses on a subject in the central area of the screen. Focus adjusts according to the distance of the subject. This is the most common focus mode.
Continuous autofocus - focuses continually on a subject; useful when shooting slow moving subjects. However, if your photos are often poorly focused switch to single area focus. Continuous autofocus consumes more battery power.
Spot focus - camera focuses on a very precise center area of the screen.
3, 9-area focus - camera automatically focuses using one or more focus points. The focus positions change according to each subject, focusing on a number of objects within a scene.
Face-Priority AF - In 2005, Nikon introduced Face-Priority autofocus, which is activated when select CoolPix digital cameras are switched to Portrait mode. A special digital detection program scans for facial details and then controls autofocus operation based on the location of the detected face in the scene.
Even if the subject moves, or as the photographer recomposes the picture, Face-priority AF keeps focus on a subject's face.
Prefocus
Prefocusing can be effectively used when there is a pre-determined, similar distance between the camera and subject. Focus is fixed until you press the focus button again or switch to a different focus mode. Digital cameras have different methods of prefocusing, so check the manual.
Manual Focus
Manual Focus Area- focus on a portion of a scene when not centered in the frame. Use one of several focus area indicators. Select the area by toggling a cursor button. This method is useful for close-up and macro shots.
Focus ring - focus manually, from a few feet to infinity, by turning a focus ring near the lens.
Focus button - depress a manual focus button and rotate a dial until the subject is in focus.
High sensitivity mode
Shooting at higher ISO helps reduce the effect of camera shake when taking pictures in low-light. It often allows photos to be taken without a flash, making images appear more natural.
However, because compact digital cameras have small sensors, image quality begins to degrade once the sensitivity is set above ISO 100. The higher the ISO, the more noise is introduced in a image.
As of this writing, with few exceptions, only Digital Single Reflex cameras provide the cleanest images at high ISO numbers.
Improving sensors
Manufacturers have begun to improve the sensors and sensor size used in consumer digital cameras. But none to date do it as well as FujiFilm with the development of it's Super CCD sensor. Not all FujiFilm cameras have the Super CCD. [See models with Super CCD]
The Super CCD sensor captures more light with less electronic noise. As a result, shots taken at ISO 400 are cleaner. Even those taken at ISO 800 can be quite useable. And while photos taken at ISO 1600 have noise and some minor loss of detail, they can be less no noisier than shots taken at ISO 400 with most other non-dsrl cameras.
Pitfalls of using high sensitivity mode
Some cameras have a high sensitivity mode that can be switched on when lighting is low. The mode automatically selects an higher ISO number according to the level of light.
When set to high ISO, some digital cameras automatically reduce the image resolution. In other words, if you have a six megapixel camera, you may only be able take high ISO photos at three megapixels.
Noise reduction and high ISO
Digital cameras address noise with built-in Noise Reduction (NR). However, Noise Reduction can cause images to look soft. Loss of fine detail and smearing of colors in the original image occurs. The higher the ISO, the more noise reduction, the more smearing and loss of detail.
Bottom line about using high ISO
Avoid using higher ISO number unless you have a digital camera that is capable of handling it well. For important low light shots, shoot at a lower ISO and use a camera support.
When shooting in low light, it's better to select an ISO number than let the camera decide for you. Test your camera to see the highest number you can tolerate.
Landscape mode
Many digital cameras have a Landscape Mode, which is a long distance scene mode also known as Infinity mode. Landscape mode is represented by an icon that looks like a mountain range.
Landscape mode provides maximum sharpness for distant and wide-vista scenes. It is suitable for photographing cityscapes, seascapes, skyscapes and forests.
When switching to landscape mode, the focus is fixed at infinity. There is usually no need to check focus before taking a picture. However, if there are objects in a scene, lock focus on one that is about third of the way between the nearest and furthest object.
Infinity mode can be useful when photographing through glass, chain-link fences and other similar scenes that are difficult to determine just where to focus.
Landscape mode shutter speed and aperture
The digital camera may automatically choose a small lens aperture. This is to provide a deep depth of field.
A slow shutter speed may also be selected by the camera when using landscape mode. If light is low, hold the camera steady or use a camera support such as a tripod.
Metering modes
Automatic exposure is a standard feature on all digital cameras. The metering system measures the amount of light in a frame and determines the best exposure. Many cameras have more than one metering mode and each evaluates a scene in a different way.
Center-weighted metering
Currently the most common digital camera metering system. Center-weighted is the metering system of choice on digicams that do not offer other metering modes. Exposure metering is averaged over the entire frame with emphasis placed on the central area. Used for general and portrait photography.
Matrix (evaluative) metering
A complex metering system whereby a scene is split up into a series of zones. Overall exposure is based on evaluating each zone individually and taking an average of the total light readings.
Spot metering
Takes a precise exposure reading only at the very center of the frame and disregards the rest. A spot meter is used when a subject is backlit or has bright light upon it and the background is dark, ie. when there are extremes in brightness in a scene. Also useful for macro photography.
Setup mode
The factory default settings for digital cameras can be changed via the Setup Mode. Here are some the most basic and common settings:
Compression/Quality - Sets the compression for recording images typically Fine (best image quality for the file size selected), Normal (very suitable image quality) and Basic (least quality though images may be perfectly suitable for email or posting on a web page.
Compression settings may have other designations such as Best, Better, Good; Standard, High, Super High (See also, digital camera file formats).
File size - Sets the number of pixels recorded for images.
Frame number - Select the file name sequence for images. With Continuous setting, images are stored beginning with the highest file number used of the previous memory card. It prevents duplicate file names when images are transferred.
Erase/Protect - delete individual photos from the memory card; protect images that you don't want to be removed during the erasure process
Format - deletes all images from a card, even protected ones. Format occasionally for better card performance. It's best to format the card in the camera, not via the computer.
Sounds - set the volume of the beep heard during camera operations. Select OFF if you wish to hear no sound.
Date/Time - set date and time.
Monitor - select LCD display options such as brightness and contrast.
Power save - To conserve battery power, choose the length of time before the LCD automatically goes off or the camera goes into standby mode.
Other - select a focus mode, set the self-timer, turn the digital zoom on and off.
JPEG file format:
JPEG, pronounced jay-peg, is an acronym that stands for the group that developed the file type, the Joint Photographic Expert Group. JPEG is a method of compression which significantly reduces the file size of photographic and other continuous tone images. An image in JPEG format has a .jpg extension: filename.jpg.
Digital cameras offer several JPEG compression levels and quality settings. For images with the least compression, the loss of quality is usually not seen by the human eye. Keeping jpeg compression to a minimum is a must if you want to print quality photos.
Some digital cameras only offer the jpeg file format. Advanced digital and Single Lens reflex cameras offer the option of shooting two additional file formats, TIFF and RAW.
JPEG files, unlike TIFF and RAW files, do not take up as much room on a memory card. They are also processed faster by the camera than the other file formats.
JPEGs store important camera settings and scene information known as EXIF data.
EXIF data
Digital cameras save JPEG (.jpg) files with EXIF (Exchangeable Image File) data. Camera settings and scene information are recorded by the camera into the image file.
Examples of stored information are shutter speed, date and time, focal length, exposure compensation, metering pattern and if a flash was used.
Use EXIF as a learning tool
Many camera owners study EXIF to compare successful photos to those that are not. Data provides insight about how camera settings affect photo characteristics such as exposure, depth-of-field and subject movement.
EXIF is read by applications that support JPEGs. They include web browsers, image editing and organizing programs and some printer drivers. The printer drivers use the information to automatically enhance images, which can result in a better looking prints.
Preserving EXIF information
If an edited image is saved correctly to preserve EXIF data, the information can be viewed online at photo hosting sites. Some photo hosting sites, such as Flickr, use the word "properties" instead of EXIF.
Saving EXIF data
When photo editing, EXIF data can be lost if an image file is not saved correctly. EXIF refers to settings and scene information recorded by a digital camera and embedded within each file.
The method to preserve EXIF data varies among editing programs, so check your manual. Photoshop 7 was used to illustrate one of the ways to preseve data in a jpeg.
1. To preserve EXIF after editing an image, use the Save AS command (not Save or Save for Web) from the File menu. The Save As dialog window opens.
2. Select JPEG from the Format drop down menu, give the file a new name, then click the Save button.
3. Next, select quality settings between one and 12 (1= Lowest quality/most compression - 12 = Highest quality/lease compression). Select a number that gives you a good balance between image quality and file size.
The EXIF data will remain embedded in the new file. As a reminder, always edit copies of originals. If you make a mistake, start over using another copy of the original.
RAW file format:
A RAW image file is often referred to as a true digital negative. The option to shoot RAW is available on many advanced and professional digital cameras. Images in this format have a .raw extension, eg: filename.raw.
There is much more latitude controlling exposure than with JPEG files. When shooting RAW, no processing is done in the camera to the file. As a result, the photographer has total control adjusting elements, such as sharpening or white balance, when editing a RAW file.
RAW and associated image fileWhen processing a RAW image, no changes are made to the actual file. A separate file is created and all adjustments are kept in the associated file.
The RAW format, considered essential by professional and serious photographers, is still not widely used by others. At this time, RAW files can not be opened with every image editor and can take longer to process when editing.
A RAW image has a smaller file size than a TIFF but is considerably larger than a JPEG.
But my digital camera doesn't shoot RAW!?!
If you're concerned because your camera doesn't shoot RAW, don't worry. Many digital camera users find JPEGs, when shot at the highest resolution and lowest compression settings, meet their expectations for image quality. Many also find JPEGs easier to edit than RAW images.
Some digital cameras have an option to take both RAW and JPEG images at the same time (JPEG + RAW setting).
TIFF file format:
TIFF (Tagged Image File Format) files don't lose image file information in the compression process. They do, however, take up a more space on a memory card compared to a JPEG. A tiff file also takes longer time to write to the card.
TIFF compression reduces images to about one-third their original size.
For example, a single TIFF image file shot at 5 MP (megapixels) is over 14 megabytes. By comparison, the same photo taken as a Fine Quality JPEG is just over two megabytes. At Normal JPEG setting, a 5 MP shot produces only a 95 KB (kilobyte) file!
Like JPEGs, EXIF information is embedded in original TIFF files.
An image file in this format has a .tif extension, eg. filename.tif.
Note: Newer digital cameras may not offer the TIFF format, but instead have RAW . If your camera has neither the TIFF or RAW file format, set the camera to its highest resolution and JPEG quality.
Aperture:
The aperture controls the amount of light that reaches a digital camera sensor. An aperture acts much like the pupil of an eye that opens wider as light decreases to let in more available light. The pupil gets smaller when light increases to reduce the amount of light entering the eye.
The combination of aperture and shutter speed are related, and effect the exposure value. The faster the shutter speed, the larger the opening of the lens and visa versa.
The diameter of an aperture is measured in f-stops. A lower f-stop number opens the aperture and admits more light onto the camera sensor. Higher f-stop numbers make the camera's aperture smaller so less light hits the sensor.
When an aperture is opened up by one f- stop, the amount of light which reaches the sensor is doubled. F-stops are expressed in three different ways: f/8, f-8, and 1:8.
Aperture settings can be used creatively to control depth of field, how much of a photo is sharp in front and back of where you focus on the main subject. The technique is useful for close-up and portrait shots.
Aperture Priority Mode
All digital cameras have exposure modes that automatically control the aperture and shutter speed. But many allow you to manually change the aperture.
When using aperture priority mode, you change the aperture and the shutter speed is automatically changed to maintain proper exposure.
Lens speed:
The speed of a lens is determined by size of the lens opening, known as aperture. The aperture controls the amount of light that reaches a digital camera sensor .
Sample lens f-stopsThe diameter of an aperture is measured in f-stops. A lower f-stop number opens the aperture to admit more light onto the sensor. Higher f-stop numbers close the lens opening so less light gets through. A lens with an f-number of f/1.8 has a larger aperture than one with an f-number of f/4.5.
The aperture, or aperture range, is indicated on the front of a lens.
Fast lens
A fast lens is one with a large maximum aperture; the larger the aperture, the faster the lens. A lens is called fast because the larger aperture lets more light pass through during a given time span. When more light falls upon a subject, pictures can be shot with faster shutter speeds .
Aperture range on a zoom lensThe aperture of a lens can be reduced if desired by the user of a camera with manual and/or semi-automatic controls. The process of reducing the aperture size is called stopping down.
It�s important to note that a lens is usually not at its sharpest when wide open, nor when stopped down too much.
One interesting effect of using a large aperture is it greatly reduces the depth of field in an scene. This is very useful to isolate a subject from the background such as when taking portraitr and some marcro shots. A photographer desiring a large depth of field (for instance when photographing landscapes) will have to stop the lens down by using a smaller aperture.
Photographers who do a lot of low light photography prefer fast lenses.
Slow lens
A slow lens is one with a small maximum aperture, such as F/4.5. A slow lens lets less light pass through towards the sensor, and exposure times will be longer.
Longer zoom lenses are generally slower and have an aperture range. They are slower at the telephoto end of zoom and faster at the wide end.
A slow lens delivers a deeper depth of field. The same is true for a fast lens sopped down. A deeper depth of field can be desirable depending on the visual effect a photographer wishes to capture in a give scene.
A slow lens is usually less expensive than a fast one
Techniques Fill in Flash or Forced Flash:
Using a flash
One obvious solution to lighting problems is to use the flash. This can work very well, but the photographer should be aware of the limitations of his/her flash. A built-in digital camera flash can reach, at most, around 12 feet, sometimes less, rarely more. Subjects are often much farther away than this, so a flash is useless in many situations.
Also, if the background is darker than the subject, or some distance away, it will probably not be correctly lit, delivering a picture with a clear subject with a dark or even black background. To help avoid this use the Fill Flash option, also known as Forced Flash, available on most cameras.
Using Fill-in flash
Fill-in flash is used to soften dark areas or shadows in a photo when a strong source of light, such as a bright sky, comes from behind a subject. This is called backlighting. You can also use fill-in flash outside when a subject is in the shade.
A camera is not as capable as the human at capturing subtle ranges of dark and light. To help understand how a camera's automatic exposure settings can be fooled in back-lit situations, think of your own eyes.
When the sun is bright, you squint to reduce the light coming into your eyes. A camera's exposure meter acts in a similar manner. The camera is sometimes fooled into "squinting" (closing down the aperture) because the camera exposes for the background light. Less light comes through the lens and causes foreground objects to become dark.
In these types of situations, select the fill-in flash setting on your camera. Fill-in flash provides a short burst of light which softly fills in dark areas. Color is truer-to-life and more detail appears in dark areas.
As a general rule, the person taking the photo should stand with his or her back to the main source of light. If lighting is bad when you're photographing scenery, try to return at a different time of day when light falls on the front rather than behind a subject.
bibliography:Digital Camera Guide for beginners and beyond
Visit the website
DIGICAMHELP
DIGITAL-PHOTOGRAPHY-SCHOOL
SONY ERICSSON K850
DEVELOPER SONY ERICSSON K850
PHONE SPECIFICATION SONY ERICSSON K850
SCHEMA SERVICE MANUAL K850
[ This Message was edited by: brazuka on 2009-01-20 01:08 ] | |
|
brazzuka's
Joined: Nov 14, 2007
Posts: > 500
From: South World-Antartida-Sweden
PM, WWW
|
Sony Ericsson Camera Driver k850 Model Sony_MCB991 5MPixel
"Who does the picture is the photographer and not a machine!"
"A picture is worth more than a thousand [1000] words."
"As the quality of cameras phones improves, it is not impossible to believe that we will all become artists." Tony Briggs
Note:
Some errors "bugs" and functions that respond to a determinated firmware and not another firmware, is a hardware problem and is not caused by driver.
Unfortunately some the resources available for the camera of k850 are blocked by firmware.
New functions as Smart contrast, Face and Smile detection, Smile shutter are blocked by firmware.
Leave a few minutes of your time to clean the sensor.You "user" will see how the photos out with better sensors always clean
Update 2008-05-04
Cybershot�_v2.7_Standard� k850
Features Cybershot�_v2.7_Standard� k850:
-New Power Sequence
-Master Clock� k850
-JPEG buffer compression SE value
-New BestPic image buffer size:
image size for 5M/3M/1M:
Normal compression=925kb
Low compression=935kb
image size for VGA:
Normal compression=189kb
Low compression=283kb
-Scenes Modes SE values:
-All Scenes
Flash Limit iso100
Flash Xenon Color iso 100
Shutter Speed 1/8s
-Scene Sports
Flash Limit iso400
Flash Xenon Color iso 400
Shutter Speed 1/1000s
Video Recording:
-Nomal mode video 25fps to 30fps high resolution
-Nigth mode video 20 to 25fps high resolution
Cybershot�_v2.7_Standard�_for_k850
Download:
http://www.4shared.com/file/4[....]hot_v27_Standard_for_k850.html
Update 2008-05-04
Cybershot�_v2.7_BestPicColor� k850
Features Cybershot�_v2.7_BestPicColor� k850:
-New Power Sequence
-Master Clock� k850
-JPEG buffer compression SE value
-Color Saturation auto mode
-New BestPic image buffer size:
image size for 5M/3M/1M:
Normal compression=925kb
Low compression=935kb
image size for VGA:
Normal compression=189kb
Low compression=283kb
-All Scenes SE values:
Flash Limit iso100
Flash Xenon Color iso 100
Shutter Speed 1/8s
-Scene Sports
Flash Limit iso400
Flash Xenon Color iso 400
Shutter Speed 1/2000s
Video Recording:
-Nomal mode video 25fps to 30fps high resolution
-Nigth mode video 20 to 25fps high resolution
Bug:
-Camera driver original SE values need to be adjusted for a better final composition of the photos.
-Don�t implemented color correction WB.
-The photos come out a little (*washed=life without the colors) out and flash on with a little yellowish on some occasions.
-Some bugs in the hardware of k850.
Cybershot�_v2.7_BestPicColor�_for_k850
Download:
http://www.4shared.com/file/4[....]v27_BestPicColor_for_k850.html
Bug:
-Camera driver original SE values need to be adjusted for a better final composition of the photos.
-Don�t implemented color correction WB.
-The photos come out a little (*washed=life without the colors) out and flash on with a little yellowish on some occasions.
-Some bugs in the hardware of k850.
Update 2008-11-20
Cybershot�_v5.21_BestPicColor� k850
Features Cybershot�_v5.21_BestPicColor� k850:
Rev0.1
-Color Correction WB Implemented
-New Color Correction Xenon flash
-New Customization Auto
-New Customization Scenes
-Customization modders and users
Video Recording:
-Nomal mode video 25fps to 30fps high resolution
-Nigth mode video 20 to 25fps high resolution
Bug:
-Sometimes unstable
-Bug scenes document missed the end line this: $cl $cx;
-The pics with WB auto are a little yellowish
-The real flash force don�t works
-Some bugs in the hardware of k850.
Cybershot�_v5.21_BestPicColor�_for_k850
Download:
http://www.4shared.com/file/7[....]521_BestPicColor_for_k850.html
Update 2008-11-25
Cybershot�_v5.25_BestPicColor� k850
Features Cybershot�_v5.25_BestPicColor� k850:
Rev0.2
-Color Correction WB Implemented
-New Color Correction Xenon flash
-New Customization Auto
-New Customization Scenes
-Customization modders and users
Update
-Fix color correction WB
-Fix scene document
-Fix color correction xenon flash
Video Recording:
-Nomal mode video 25fps to 30fps high resolution
-Nigth mode video 20 to 25fps high resolution
Bug:
-Color Correction accumulates along with Color Correction xenon flash when used the flash on.
example:Color Correction + Color Correction xenon flash = distorts the colors; the photos with flash on appear "yellowish"
-Some Scenes need adjusted the shutter speed.
-Response Scanner AF Focus slow *camdriver original k850.
-Some bugs in the hardware of k850.
-The real flash force don�t works and don�t atictivate *camdriver original k850.
Cybershot�_v5.25_BestPicColor�_for_k850
Download:
http://www.4shared.com/file/7[....]525_BestPicColor_for_k850.html
Update 2008-12-20
Cybershot�_v6.0_BestPicColor� k850
==================
Version v6.0 changelog:
==================
-Scenes:
All scenes are pre configured and adapted for each type of environment.
-Scene "Nigth Portrait":
-ISO 50 (EV -2).
-ISO 64 (EV 0).
-ISO 200 (EV +2).
-shutter speed: 2s (condition of ligth "luminosity").
-Scene "Twiligth Portrait":
-Special settings for this scene.
-ISO 100 (FLASH)(for photos of close).
-ISO 200 (FLASH)(for photos of afar).
-ISO 320 (FLASH)(for when you can not make for being too dark).
-ISO 100 (em EV 0).
-shutter speed: 1/5s (without flash).
-shutter speed: 1/15s (with flash).
-OBS.: This scene doesn�t have forced flash
Colors Correction WB:
- Correction Auto for photos with luminosity
- Colors Correction is no longer influencing the flash.
- To turn off the color correction during the day, simply choose "Flash Off" menu "Flash" or shortcut key "#". During the night, no color correction works, get a good picture.
Forced Xenon Flash Smart�:
- To access: Choose "Reductor Red-Eye" (R.E.R.) in "Flash".
- Shoot-4 times (reducing red-eye is forced).
- Shoot-exclusive scenes for daytime
Focus:
- Scanner focus time response more fast
Techniques HDR
-Techniques HDR EV exposure aborted don�t avaliable maybe next versions
V�deo:
Now! two [2] resolutions for video recording...
- 352x288 video recording 20fps to 24 fps [CIF]
- 320x240 video recording 25fps to 30 fps [QVGA]
Format------Video Resolution
SQCIF--------------128 � 96
QCIF---------------176 � 144
CIF-----------------352 � 288 =>Cybershot�_v6.0_BestPicColor�
4CIF----------------704 � 576
16CIF---------------1408 � 1152
SXGA =>The SXGA or the Super Extended Graphics Array is a display specification that can display 1280x1024 pixels or approximately 1.3 Mega Pixels.
SVGA =>The SVGA or Super VGA can support 800 x 600 pixel resolution which adds approximately to 0.5 Mega Pixels
VGA =>The VGA or the video graphics array is a display resolution capable of displaying 640x480 pixels which is roughly 0.3 Mega Pixels
QVGA =>The QVGA also know as quarter VGA is a display resolution of 320x240 pixels which works out to roughly 0.07 Mega Pixels
CIF =>CIF or Common Intermediate Format is used to define a display resolution of 352 X 288 pixels which is roughly 0.1 Megapixels
16CIF =>16CIF is sixteen times CIF which is 1408 x 1152 pixels or 1.6 Megapixels
4CIF 4CIF=>resolution is four times CIF which is a display resolution of 704 x 576 or 0.4 Megapixels
QCIF =>QCIF or quarter CIF is a display resolution of 176 X 144 pixels or 0.02 Megapixels
Sub-QCIF =>Sub-QCIF stands for a display resolution of 128 x 96 pixels or 0.01 Megapixels
Secondary Videocall Camera VGA CAM/Frontal Camera VGA CAM:
- Video Recording 40 fps by mms
- Time VideoCall 32s by mms limited by the firmware
You "User" pay attention and please READ AND THINK!
User�s Guide Quickly:
NOTE 1:Flash small force the life of the tube and the battery!So if they do not want to flash just forced open the driver with a text editor and modify this line.
NOTE 2: The flash forced to work all the scenes with flash, EXCEPT scene in "Portrait with Little Light" because of its slow shutter.
NOTE 3: If you "user" decide to force the Automatic flash, remember to turn off the flash "R.E.R.".
NOTE 4: If you"user" decide to force the auto flash, REMEMBER: The colors correction will influence the flash forced normal, because even being forced into a position to.
Lots of light, the driver recognizes that there are conditions for the colors correction to be enabled.If you "user" don�t want to colors correction(CC),modify the values.
Remember also that the saturation continue working normally!
Continue>>>"all changes are within the driver"
NOTE 5: Forced flash=>decrease the "life" of xenon tube and decrease de life time of battery on the phone!
NOTE 6: The forced flash works for all scenes with flash, EXCEPT on scene TWILIGHT PORTRAIT! (because the slow shutter)
NOTE 7: If YOU decide to FORCE the flash on NORMAL (1 shutter) REMEMBER to turn off the flash R.E.R. on "FC = 13;" to "FC = 00;"
NOTE 8: If YOU decide to FORCE the flash on NORMAL (1 shutter) REMEMBER: the Colors Correction will WORK with FORCED FLASH
The force flash "normal" works with C.C. because the flash is not "on" in bright conditions.
If you "user" don't want the correction color with forced normal flash "on", please turn off the correction color on "CN = 01;"
In R.E.R.: Colors correction reseted (Forced R.E.R. and Auto R.E.R.).
In camdriver is a part called "customize" where are the "functions settings", it puts the values that you want for each scene, as values are:
Functions Seetings:
->Manual Shutter Speed Slow
->Manual Shutter Speed Xenon Flash (next version)
->Manual Flash Pulse (next version)
->FPS
->Contrast
->Exposure
->Focus (works only for infinite)
->Brightness
->Sharpness
->Colors Saturation
->Hue
->Manual ISO
->Manual ISO Xenon Flash
->Manual Color Correction WB
->Manual Color Correction Xenon Flash
READ ABOUT GUIDE MANUAL FOR CHANGE THE VALUES OF FUNCTIONS
ALL THE VALUES OF FUNCTIONS ARE CHANGED INSIDE OF CAMDRIVER K850
ISN�T A SUPERMODE, MINISUPERMODE OR MANUAL SETTINGS
Bug:
-Photos larger than 1500kb can not be edited by Photo Fix and PhotoDJ.
-Problem about "runing another application" restart the camera.
-Scene document a small error "bug".
Now you "user" and "modder" can make your own camdriver and change the functions and values respectively, not depending more than third.
You "user" and "modder" can play a bit with the functions and customize their own camdriver to your taste.
All functions and informations here in camdriver has total conditions so that you "user" and "modder" can develop a supermode or minimode for these models k850/c702/c902/c905/c510/w902/w995.
Always read the information on the sensors and their language, search in the forum esato because the information are available for you "user" and "modder".
What is a Xenon Flash?
Some phones have a camera with flash Xenon (Xe) incorporated. The flash lets you take pictures in dark environments. He emits a flash of high intensity at the right time, allowing you to take well lit photos indoors or in low light.
Note: Do not put your finger near the flash of the camera, as reflected in the finger may disturb the light sensor and result in a photo
sub/over exposed.
How do I avoid getting underexposed flash images?
Make sure that you are not holding your fingers close to the sensor which is placed just under the flash.
Technical explanation: When you take an image and the flash goes off, there is a small light sensor next to the flash collecting the reflected light from the object. When enough light is reflected back, the light sensor gives a signal which stops the Xe flash in order to get correctly exposed images. If you hold the phone incorrectly, your fingers will reflect light from the flash directly into the light sensor, the Xe flash will then be stopped to early and the image will get underexposed (=too dark). "
Fill in flash or Forced Flash:
Flash with daylight
One way to reduce the contrast between the areas of light and shadow with intense sun is "fill" the shadows with light from an electronic flash. (The results can be satisfactory even with a simple camera. Try it and see).
Fill Flash or Forced Flash Sample Images

Cybershot�_v6.0_BestPicColor�_for_k850
Download:
http://www.4shared.com/file/8[....]v60_BestPicColor_for_k850.html
Sony Ericsson Camera Driver k850 Model Omnivision 6680/Premier/Foxconn Secondary Videocall Camera VGA CAM
Update 2009-01-05
v3.3_Videocall Camera VGA CAM for k850
-Now Video Recording with Secondary Front Camera or Videocall Camera VGA CAM
-Video Recording 40fps to 45fps
-Time Video Recording 32s by mms
-Implemented some functions in Automode start cam OVT suggestion
*if necessary change the values for the functions
ONLY WORKS FOR SENSOR VGA CAM!!!
=>Normal colors
=>Warm colors Colors saturation
=>Gamma Settings
=>Skin tones 1
=>Register dump
=>PSA Color settings
=>Skin tones 2
=>LCC compromise
=>Skin tones 3
=>LCC Flextronics
=>Increased contrast
=>Decreased contrast
=>Default contrast
=>LCC Foxconn
=>Light Meter
=>Increase Horizontal- startpos with 4 pixels
=>Increase Vertical- startpos with 4 pixels
=>Implemented properties based Secondary Front Camera or Videocall Camera w910 settings to OVT suggestion
Set LCC V-mirror in FIRMWARE_2
Set V-mirror and LCC V-mirror in 400x400 SS
Set V-mirror in ITP QVGA VF
Updated settings according to OVT R2.9 for WP-correction in SS
Some layout changes
Addad property 2a for ESD detection and recovery
Changed zoom setting at vf_config for DMS00206218
How record videocall camera/secondary front camera???
Tutorial recording video by Sombra
link:
http://www.esato.com/board/viewtopic.php?topic=181234
sample videos v3.3_Videocall Camera VGA CAM for k850:
link:
http://www.4shared.com/dir/6879730/72d44b08/k850.html
bug
*time video recording only 32s firmware limitation
Cybershot�_v3.3_Videocall_Camera_VGA_CAM_for_k850
Download:
http://www.4shared.com/file/8[....]l_Camera_VGA_CAM_for_k850.html
Update 2009-03-05
Cybershot�_v8.0 BestPicColor� Final k850
==================
Version v8.0 changelog:
==================
-New Master Clock�
-Video stable
-Photo stable
-Scenes:
All scenes are pre configured and adapted for each type of environment.
-Scene "Twiligth Portrait":
-Special settings for this scene.
-ISO 100 (FLASH)(for photos of close).
-ISO 200 (FLASH)(for photos of afar).
-ISO 320 (FLASH)(for when you can not make for being too dark).
-ISO 100 (em EV 0).
-Scene "Twiligth":
-Manual ISO for this Scene and only works with scene Twiligth
-Manual shutter (the true reg of manual shutter) fixed in 2 sec.
Colors Correction WB:
- Correction Auto for photos with luminosity
- Colors Correction is no longer influencing the flash.
- To turn off the color correction during the day, simply choose "Flash Off" menu "Flash" or shortcut key "#". During the night, no color correction works, get a good picture.
- Colors Correction adjusted and balanced for any occasion
Smart� Forced Flash Xenon:
- To access: Choose "Reductor Red-Eye" (R.E.R.) in "Flash".
- Shoot-3 times (reducing red-eye is forced).
- Shoot-exclusive scenes for daytime (Shoot-1 time only day)
- Now with manual shutter speed xenon flash on RER and RER Forced
How to use Smart� Forced Flash Xenon???
Smart� Forced Flash Xenon:
- Forced -> Reducer for Red Eyes (shooting shutter speed xenon flash with manual control in EV)
Normal -> Auto Flash (Manual shutter on RER Auto Flash -> Normal RER with manual shutter)
Color Filters�
- -Off -> Off!
- -Negative -> Green Filter Color
- -Solarize -> Red Filter Color
- -Sepia--> Yellow Filter Color
- -Black and White -> Blue Filter Color
Disable and Enable Color Filters�:
Flash Off -> EFFECTS = COLOR FILTERS�
Flash On -> EFFECTS = EFFECTS
* Forced or Auto (Auto or REV)
* Effects replaced by Color Filters�
V�deo:
Now! two [2] resolutions for video recording... the same of the others versions.
- 352x288 video recording 20fps to 24 fps [CIF]
- 320x240 video recording 25fps to 30 fps [QVGA]
Functions and Features:
->More Stable [√] avaliable
->New area customization for users and modders only in Scenes [√] avaliable
->New White Balance adjusted [√] avaliable
->New Color Correction adjusted [√] avaliable
->New Scenes stable with Register Manual Shutter Speed slow/fast [√] avaliable
->New *Video Recording FPS with frequency 30mhz CIF VR [√] avaliable
->New Master Clock� for k850 stable video/photo [√] avaliable
->Manual Shutter Speed Xenon Flash Implemented [√] avaliable
->The first Smart Forced� Xenon Flash stable and adjusted [√] avaliable
->Color Filters� Implemented [√] avaliable
->The first Manual Control, Now Two [2] controls for you "user" [√] avaliable
->New Interface Text with some functions implemented [√] avaliable
Cybershot�_v8.0_BestPicColor�_Final_for_k850_Final
Download:
http://www.4shared.com/file/1[....]stPicColor_Final_for_k850.html
The last launch of the series BestPicColor� for k850
Thanks:
Thanks to all for sharing information, our programming and code for this models.
We do not have any desire to acquire copyright on new codes implemented in the sensors but we respect the intellectual property of others, and we ask our users and modders to do the same.
[ This Message was edited by: brazzuka's on 2009-06-16 20:45 ] |
plankgatan
Joined: May 20, 2007
Posts: > 500
From: Sweden fur alle
PM |
is this the real deal ????????????
|
brewcaster
Joined: Aug 28, 2006
Posts: 77
PM, WWW
|
Ok, now what? How do we edit the drivers on K850? I tried xs++, says phone not supported.... |
number1
Joined: Sep 12, 2007
Posts: > 500
From: UK,kent,Sittingbourne
PM |
i also made a k850i driver ages ago, but there is no way to access the k850's FS and apply it. |
Supa_Fly
Joined: Apr 16, 2002
Posts: > 500
From: Toronto, Ontario
PM, WWW
|
So we bookmark thread for future use?!
|AppleTV2|iPhone 12Mini 256GB|iPad Pro 256GB| Previously ...  K750|Z500|Z520|K700|K790i|K850i, :Ericsson: T18z|T28World|T36m x3|T68m (Ericsson, not the rebranded T68i). |
number1
Joined: Sep 12, 2007
Posts: > 500
From: UK,kent,Sittingbourne
PM |
i'm sure this thread will be useful when you can use xs++ to change drivers on the k850 might be a while yet, k850i driver isn't that different from the k800i one so it's not that difficult to mod, if i decide to buy the phone then i will also mod the driver.
[ This Message was edited by: number1 on 2008-05-04 18:35 ] |
eddie2020
Joined: Apr 28, 2008
Posts: 331
PM |
number1 u really rich.... purpose to buy 850 to find out how to mod...
why dont try C902?? K series+Wseries=Cseries xD
after u mod those 850 will u stop mod our k810 or k800 @@
|
vegetaleb
Joined: May 03, 2002
Posts: > 500
From: Lebanon
PM |
I hope we can modify video rec but I can't see any settings for video bitrate |
number1
Joined: Sep 12, 2007
Posts: > 500
From: UK,kent,Sittingbourne
PM |
video resolution can't be modified, only video fps can be changed via camdriver. |
0kti
Joined: Dec 24, 2006
Posts: 290
From: Poland
PM, WWW
|
video resolution is not possible by mod cam driver
[ This Message was edited by: 0kti on 2008-05-04 21:08 ] |
vegetaleb
Joined: May 03, 2002
Posts: > 500
From: Lebanon
PM |
And what about photo compression?
Do you think we could go up to 1.5mb per photo so we increase greatly the quality? |
brazzuka's
Joined: Nov 14, 2007
Posts: > 500
From: South World-Antartida-Sweden
PM, WWW
|
some samples of photos k850
Photos by M�rcio "Sr. BranquinhuH�"


� All rights reserved.
� Todos os direitos reservados.
Do Not Copy!!
This picture has all rights reserved. Thank you very much.
Stay the will to
Photo by Marcio "Sr. BranquinhuH�"
Thanks friend
[ This Message was edited by: brazuka on 2008-07-02 01:19 ] |
DarKMaGiCiaN
Joined: Aug 25, 2006
Posts: > 500
PM |
me 2 i alrady have my own version of k850i camdriver just waiting for a way to uplad it
[ This Message was edited by: DarKMaGiCiaN on 2008-06-02 20:31 ] |
brazzuka's
Joined: Nov 14, 2007
Posts: > 500
From: South World-Antartida-Sweden
PM, WWW
|
DarKMaGiCiaN
me 2 i alrady have my own version of k850i camdriver just waiting for a way to uplad it
You can apply the drivers with box  but $$$ cash cash box but $$$ cash cash box  like setool box like setool box
for now with box perhaps free...
| |
|
Access the forum with a mobile phone via esato.mobi
|


 Posted: 2008-05-03 17:24


